Blue-Green Deployment With Istio using terraform and helm.
In previous post, I do install istio-operator and a default istio profile with helm and terraform. I had also shown a blue-green deployment with Valina k8s.
Motivation:
The motivation of this walkthrough is provisioning istio with terraform.
In this post, We talk about refactoring Valina blue-green deployment to istio way. However, We all know, Istio is not just for blue-green deployment. I do start with basic features that istio provide, So we can gradually discover the feature provided by istio. This writing is about some basic concepts and getting started with istio in terraform way also using helm.
I had merged the previous two branches “install-istio-with-istio-operator-helm-chart” and “helm-chart-blue-green” to master.
If you lost the git location here it is, go ahead and clone
git clone https://github.com/nahidupa/k8s-eks-with-terraform.git
To follow this post checkout to tag “blue-green-deployment-with-with-istio-starting-point”.
To see the end result of this post checkout to branch “blue-green-deployment-with-with-istio” from
git checkout blue-green-deployment-with-with-istio
Revisit closely what we have now in the istio profile. (tag/blue-green-deployment-with-with-istio-starting-point)
default.yaml
apiVersion: install.istio.io/v1alpha1
kind: IstioOperator
metadata:
  namespace: istio-system
  name: basic-istiocontrolplane
spec:
  profile: default
  components:
    pilot:
      k8s:
        resources:
          requests:
            memory: 3072Mi
  addonComponents:
    grafana:
      enabled: true
values.yaml
istioNamespace: istio-system
istioInjection: disabled
We see, we just have an istio-profile install by istio operator with a basic profile only has grafana enabled. Before doing farther I would like to add enabled kiali.
apiVersion: install.istio.io/v1alpha1
kind: IstioOperator
metadata:
  namespace: istio-system
  name: basic-istiocontrolplane
spec:
  profile: default
  components:
    pilot:
      k8s:
        resources:
          requests:
            memory: 3072Mi
  addonComponents:
    grafana:
      enabled: true
    kiali:
      enabled: true
Notes: Terraform cannot detect changes in helm charts. Any values not coming from terraform it cannot compare with its state and detect the changes. I will address this in a future post. For now, let’s clean up all previously installed items. Such as istio-profile,helm-deploy-blue-web-echo,helm-deploy-green-web-echo by terragrunt destroy, as we are going to do a huge change here to avoid confusion.
We need to set the kiali-secret, So it can take default username and password before installing the istio-profile. I do highly recommend to read kiali installation document to get an idea about kiali installation with kubectl. We will be going to do that in terraform.
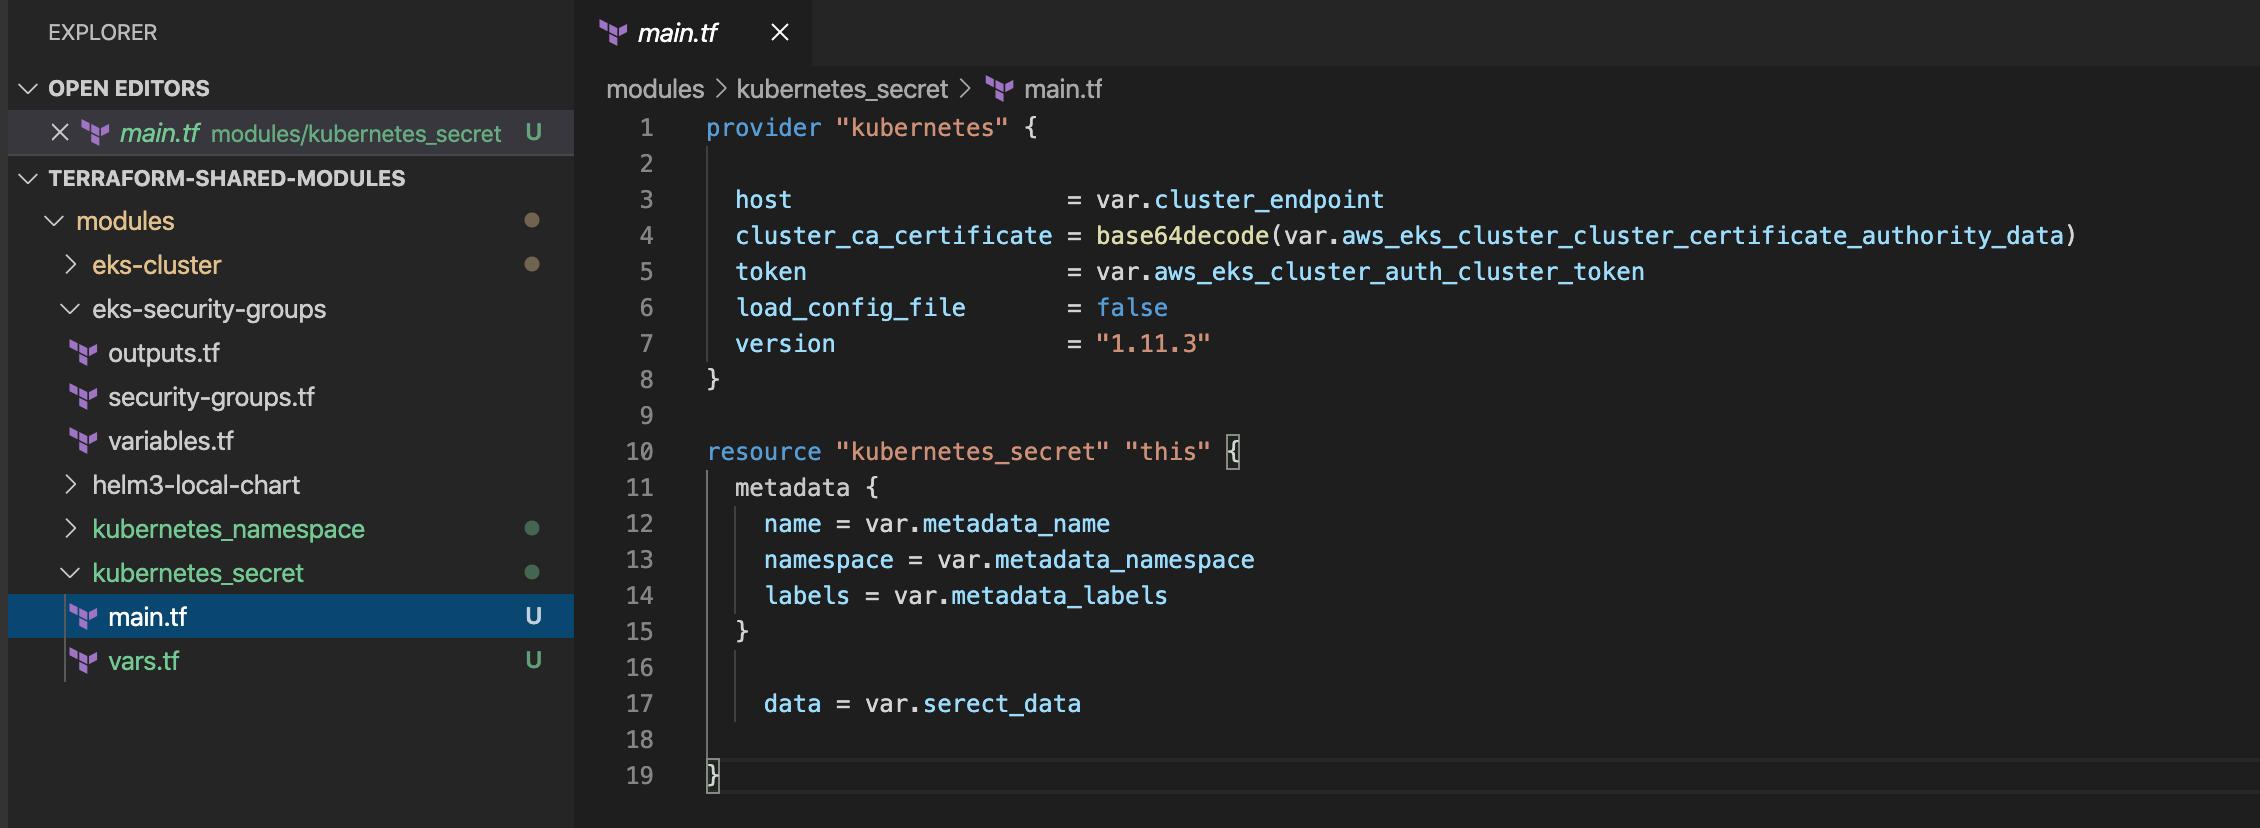
Let’s create a shared module “kubernetes_secret” in repository “terraform-shared-modules” to use that in istio-kiali-secret module in the k8s-eks-with-terraform repository. We can do this by “kubernetes_secret” resource with “kubernetes” provider. I’m not going to explain this more as this is very state forward.
Shared module kubernetes_secret
istio-kiali-secret module
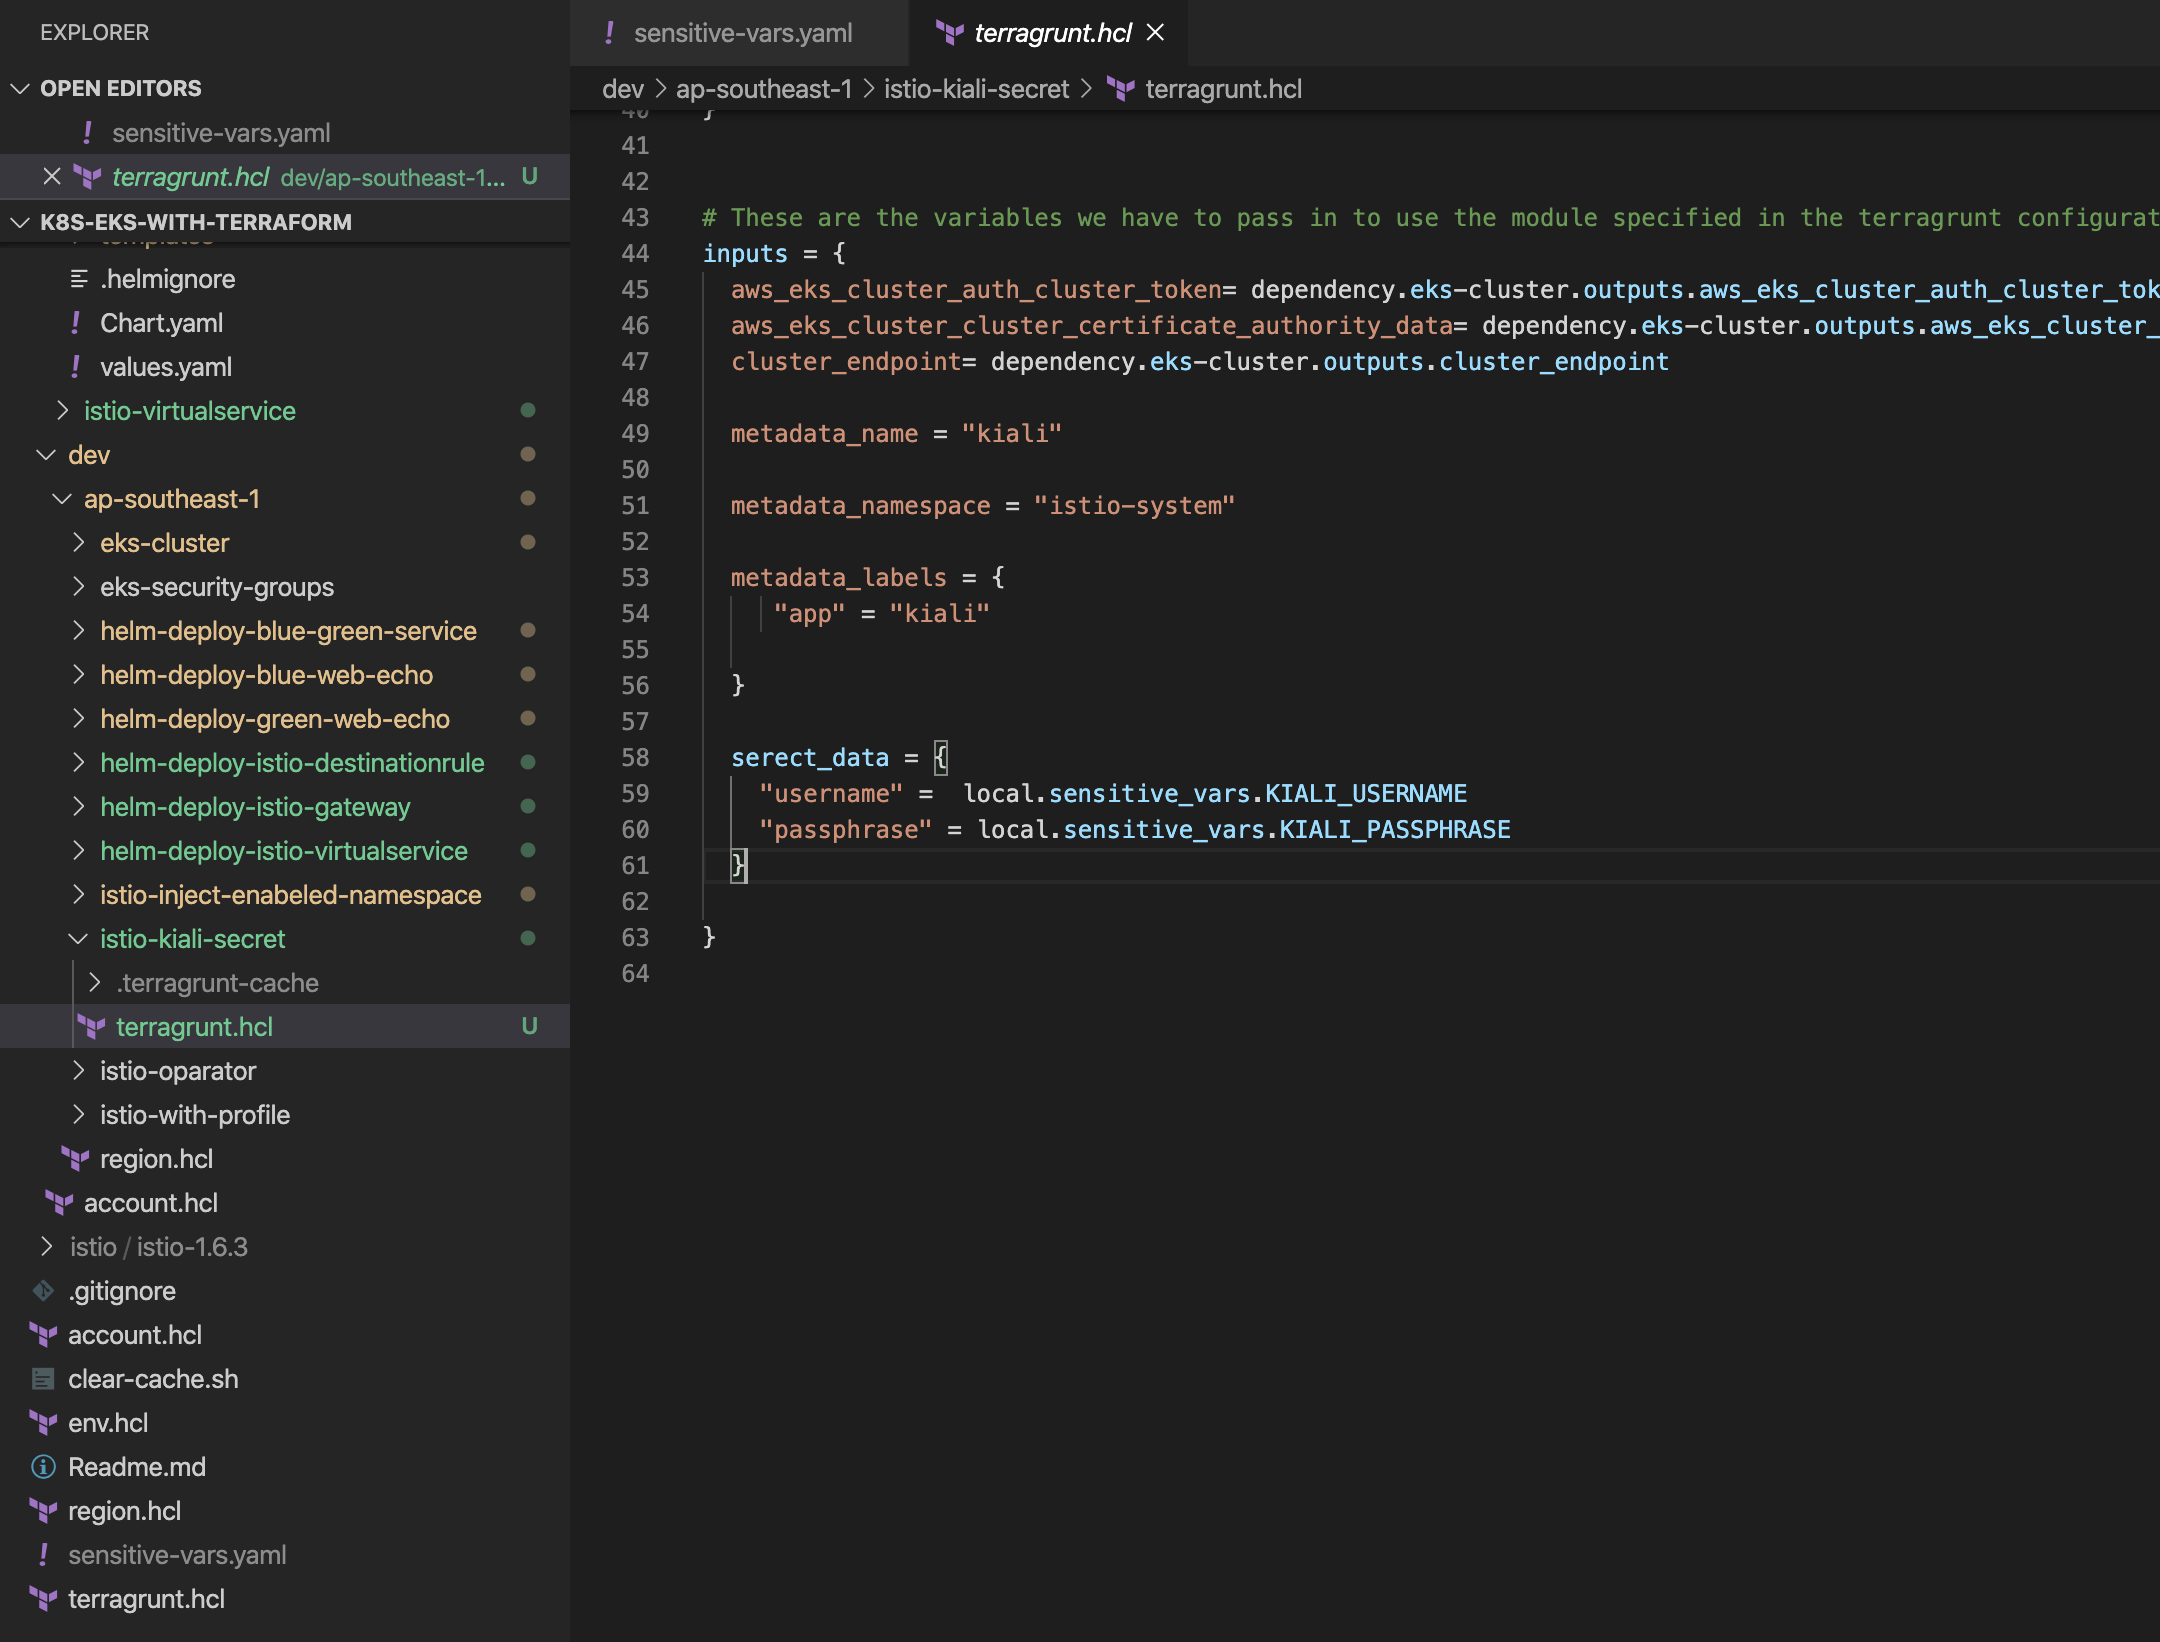
Notes: Do not encode the KIALI_USERNAME and KIALI_PASSPHRASE here, this is no need.
After creating this secret’s let’s install istio profile.
cd ../istio-with-profile
terragrunt apply
We can access kiali dashboard by port-forword to the localhost.
kubectl port-forward service/kiali 20001:20001 -n istio-system
Browse the URL http://localhost:20001/kiali/.
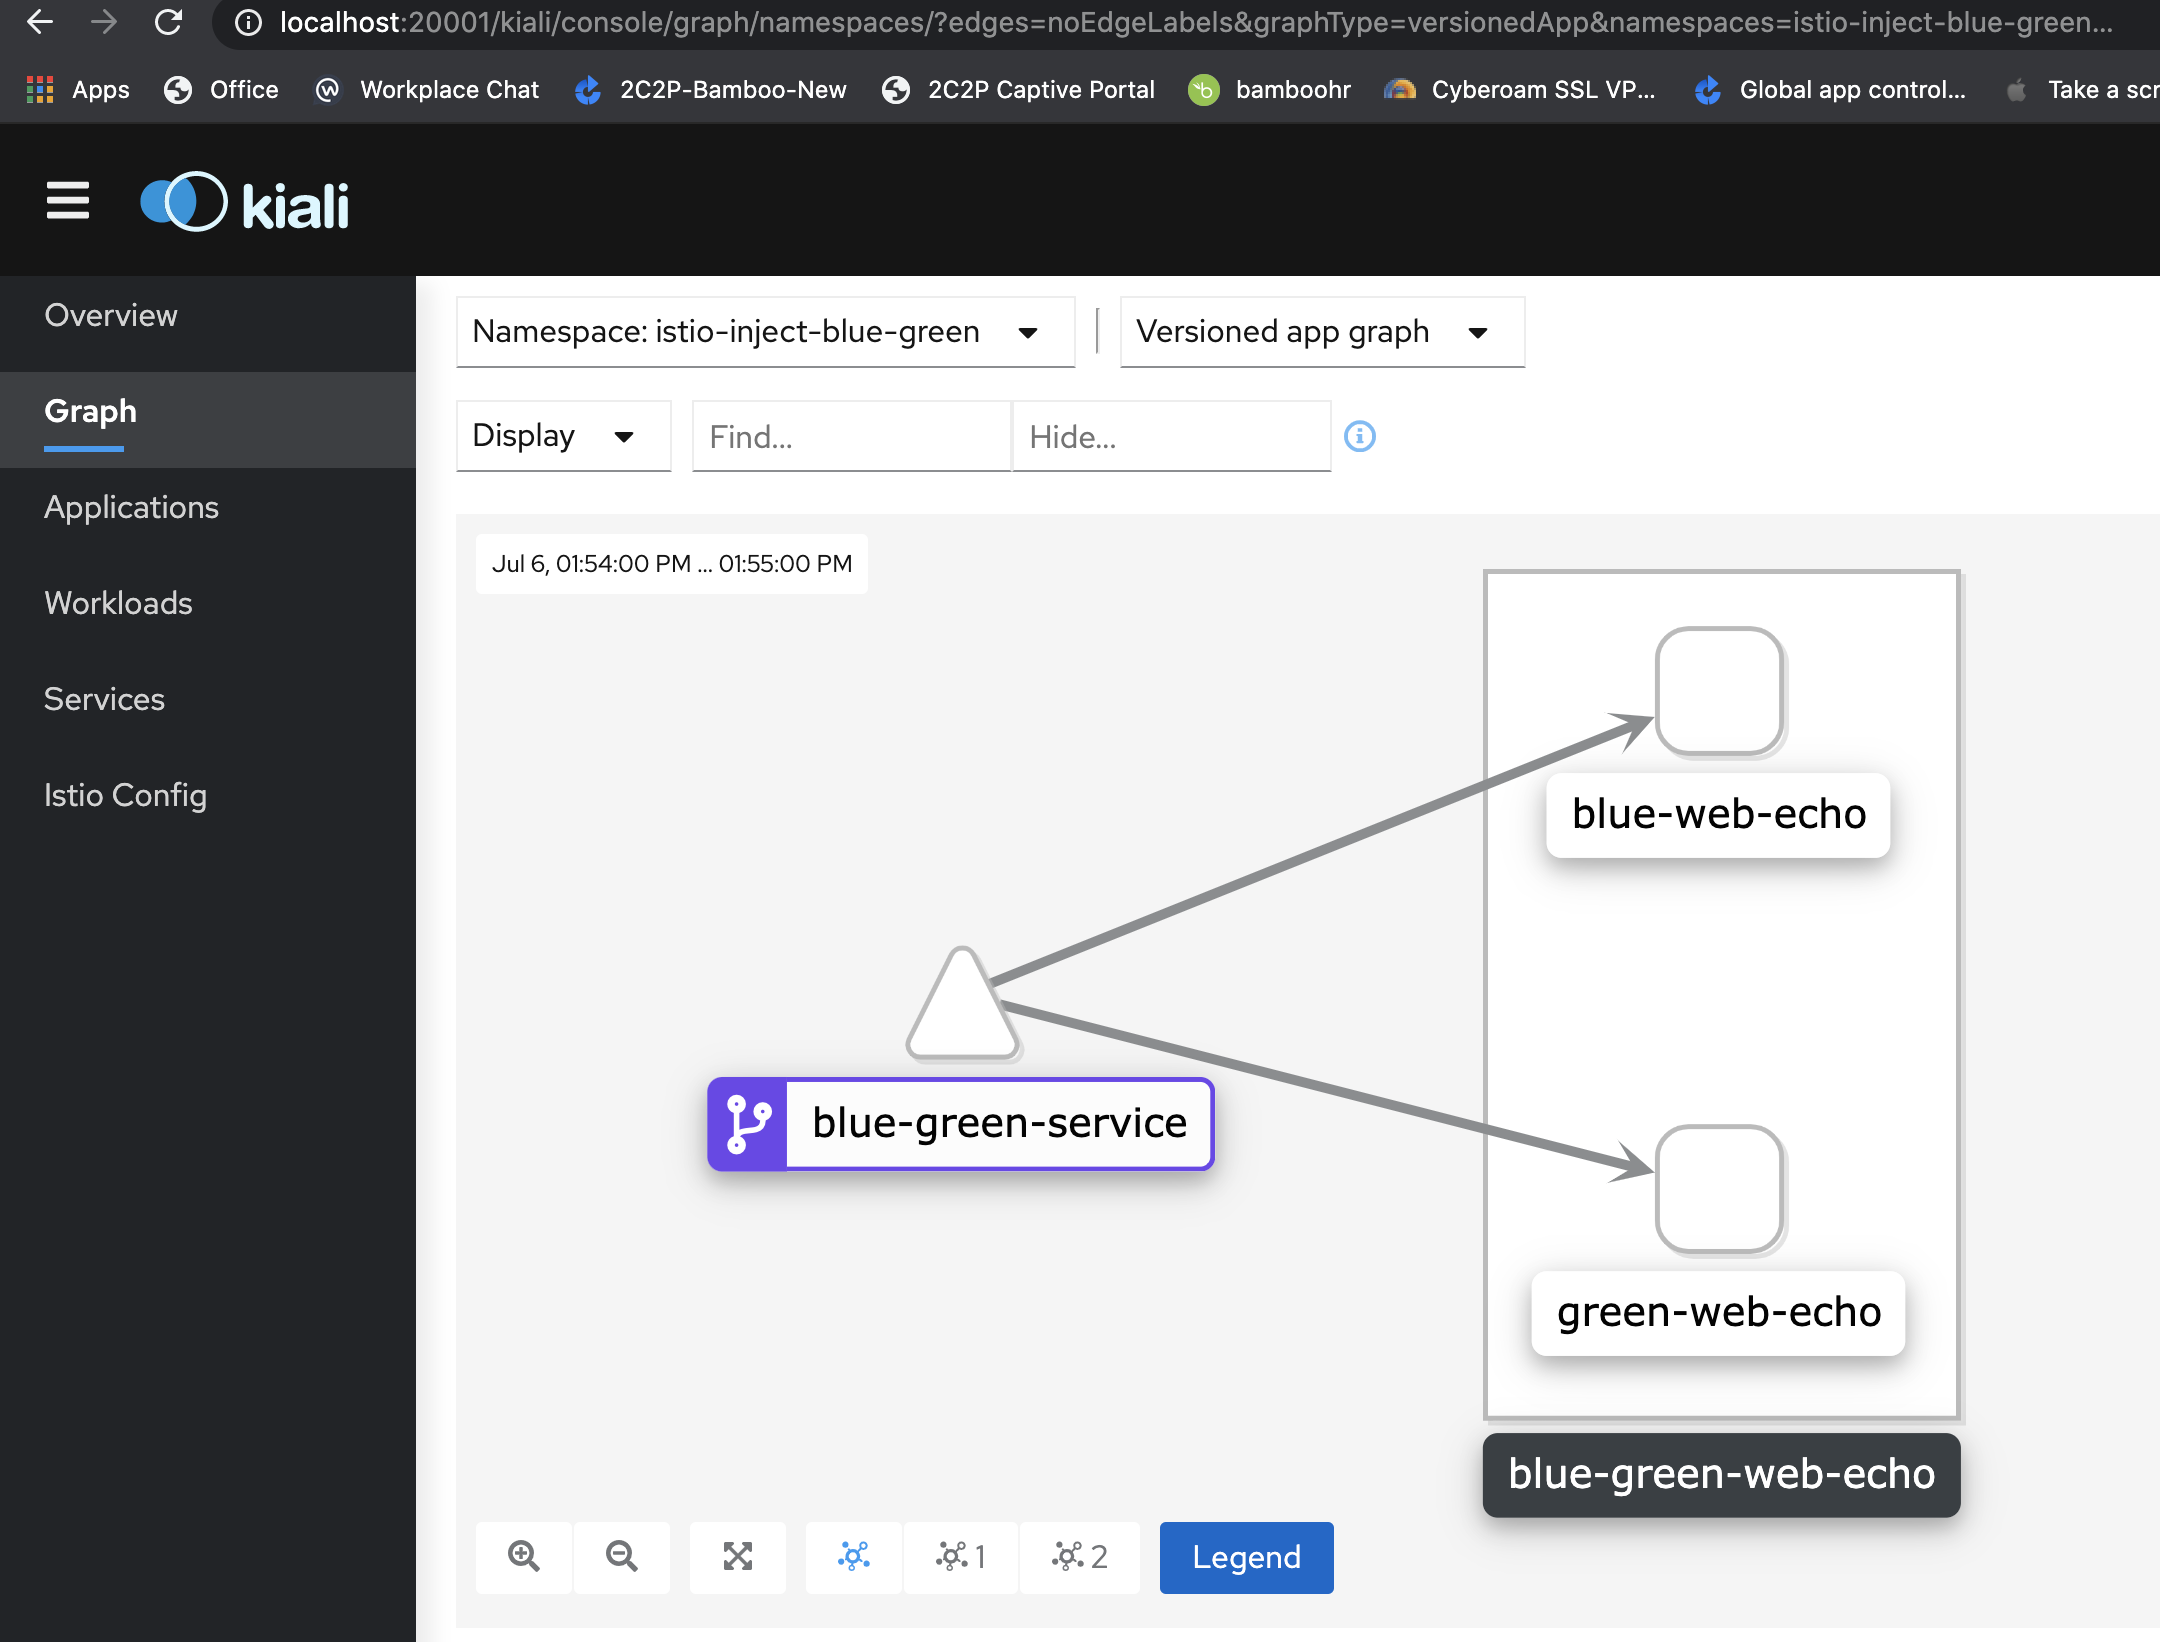
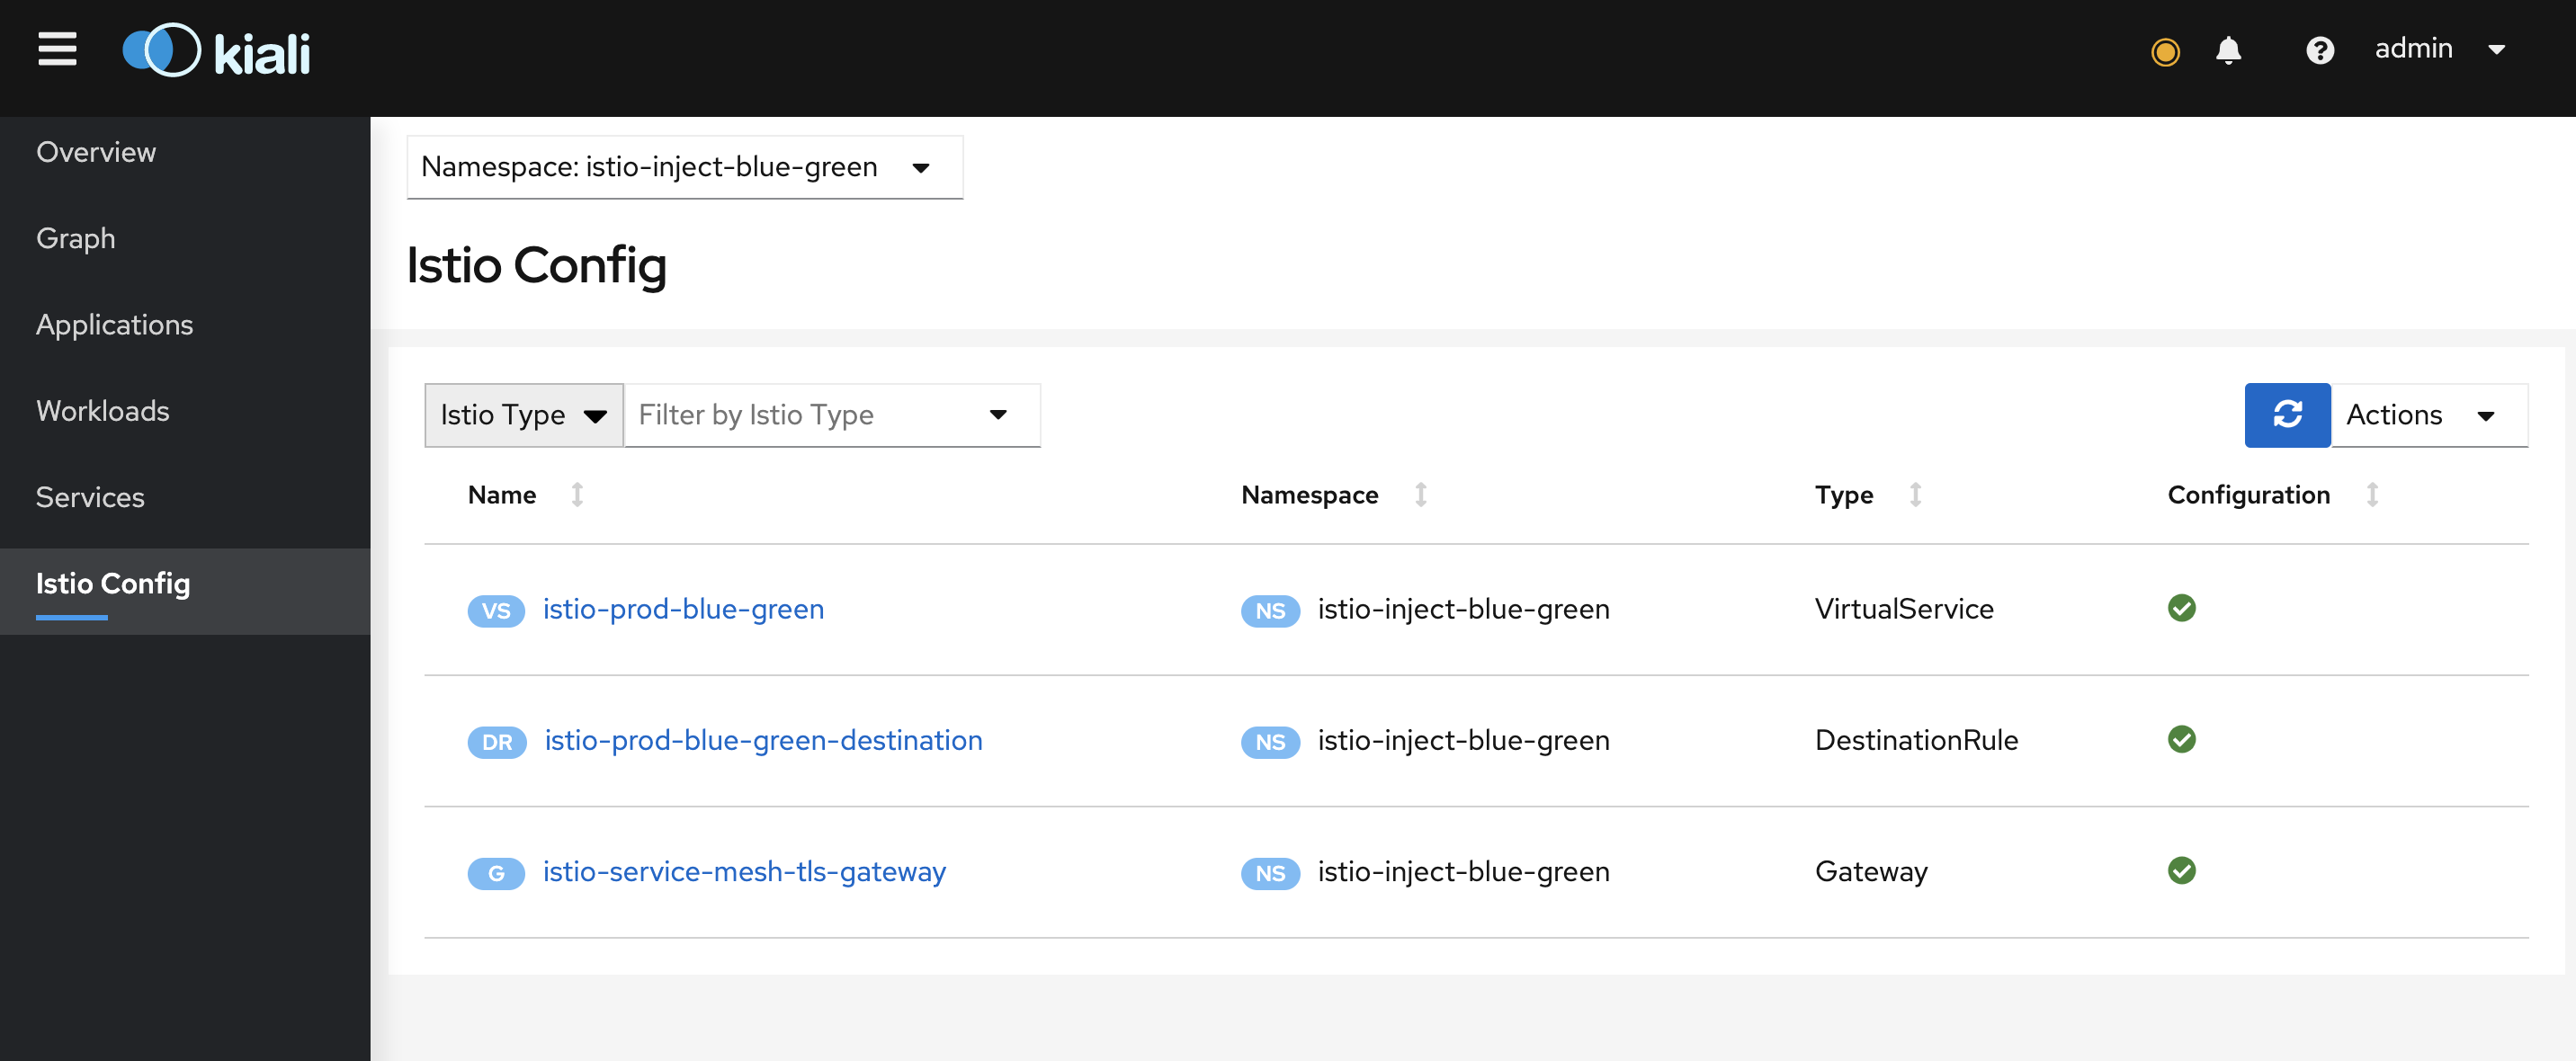
I do install Kiali because it helps a lot, It shows if any istio config is invalid and visual status of your mesh. At this moment the kiali dashboard may not look like the picture with a nice graph as we do not deploy anything yet. I have taken this screenshot after deploy blue-green service and other charts.
Again this post is not about what is istio or how it worked, more on how to provisioning istio with terraform and helm, if you are not familiar with istio concept it’s better to have a look on istio concepts first.
The next step is to deploy applications and inject the istio sidecar. Istio sidecar can be injected manually or can be done auto-injection by labeling a namespace. If a namespace in k8s is inject enabled all pods scheduled to the namespaces will automatically inject the envoy sidecar.
Now, I’m going to create a namespace “istio-inject-enabeled-namespace” that label to “istio-injection” enabled.
Let’s create a namespace with Kubernetes provider.
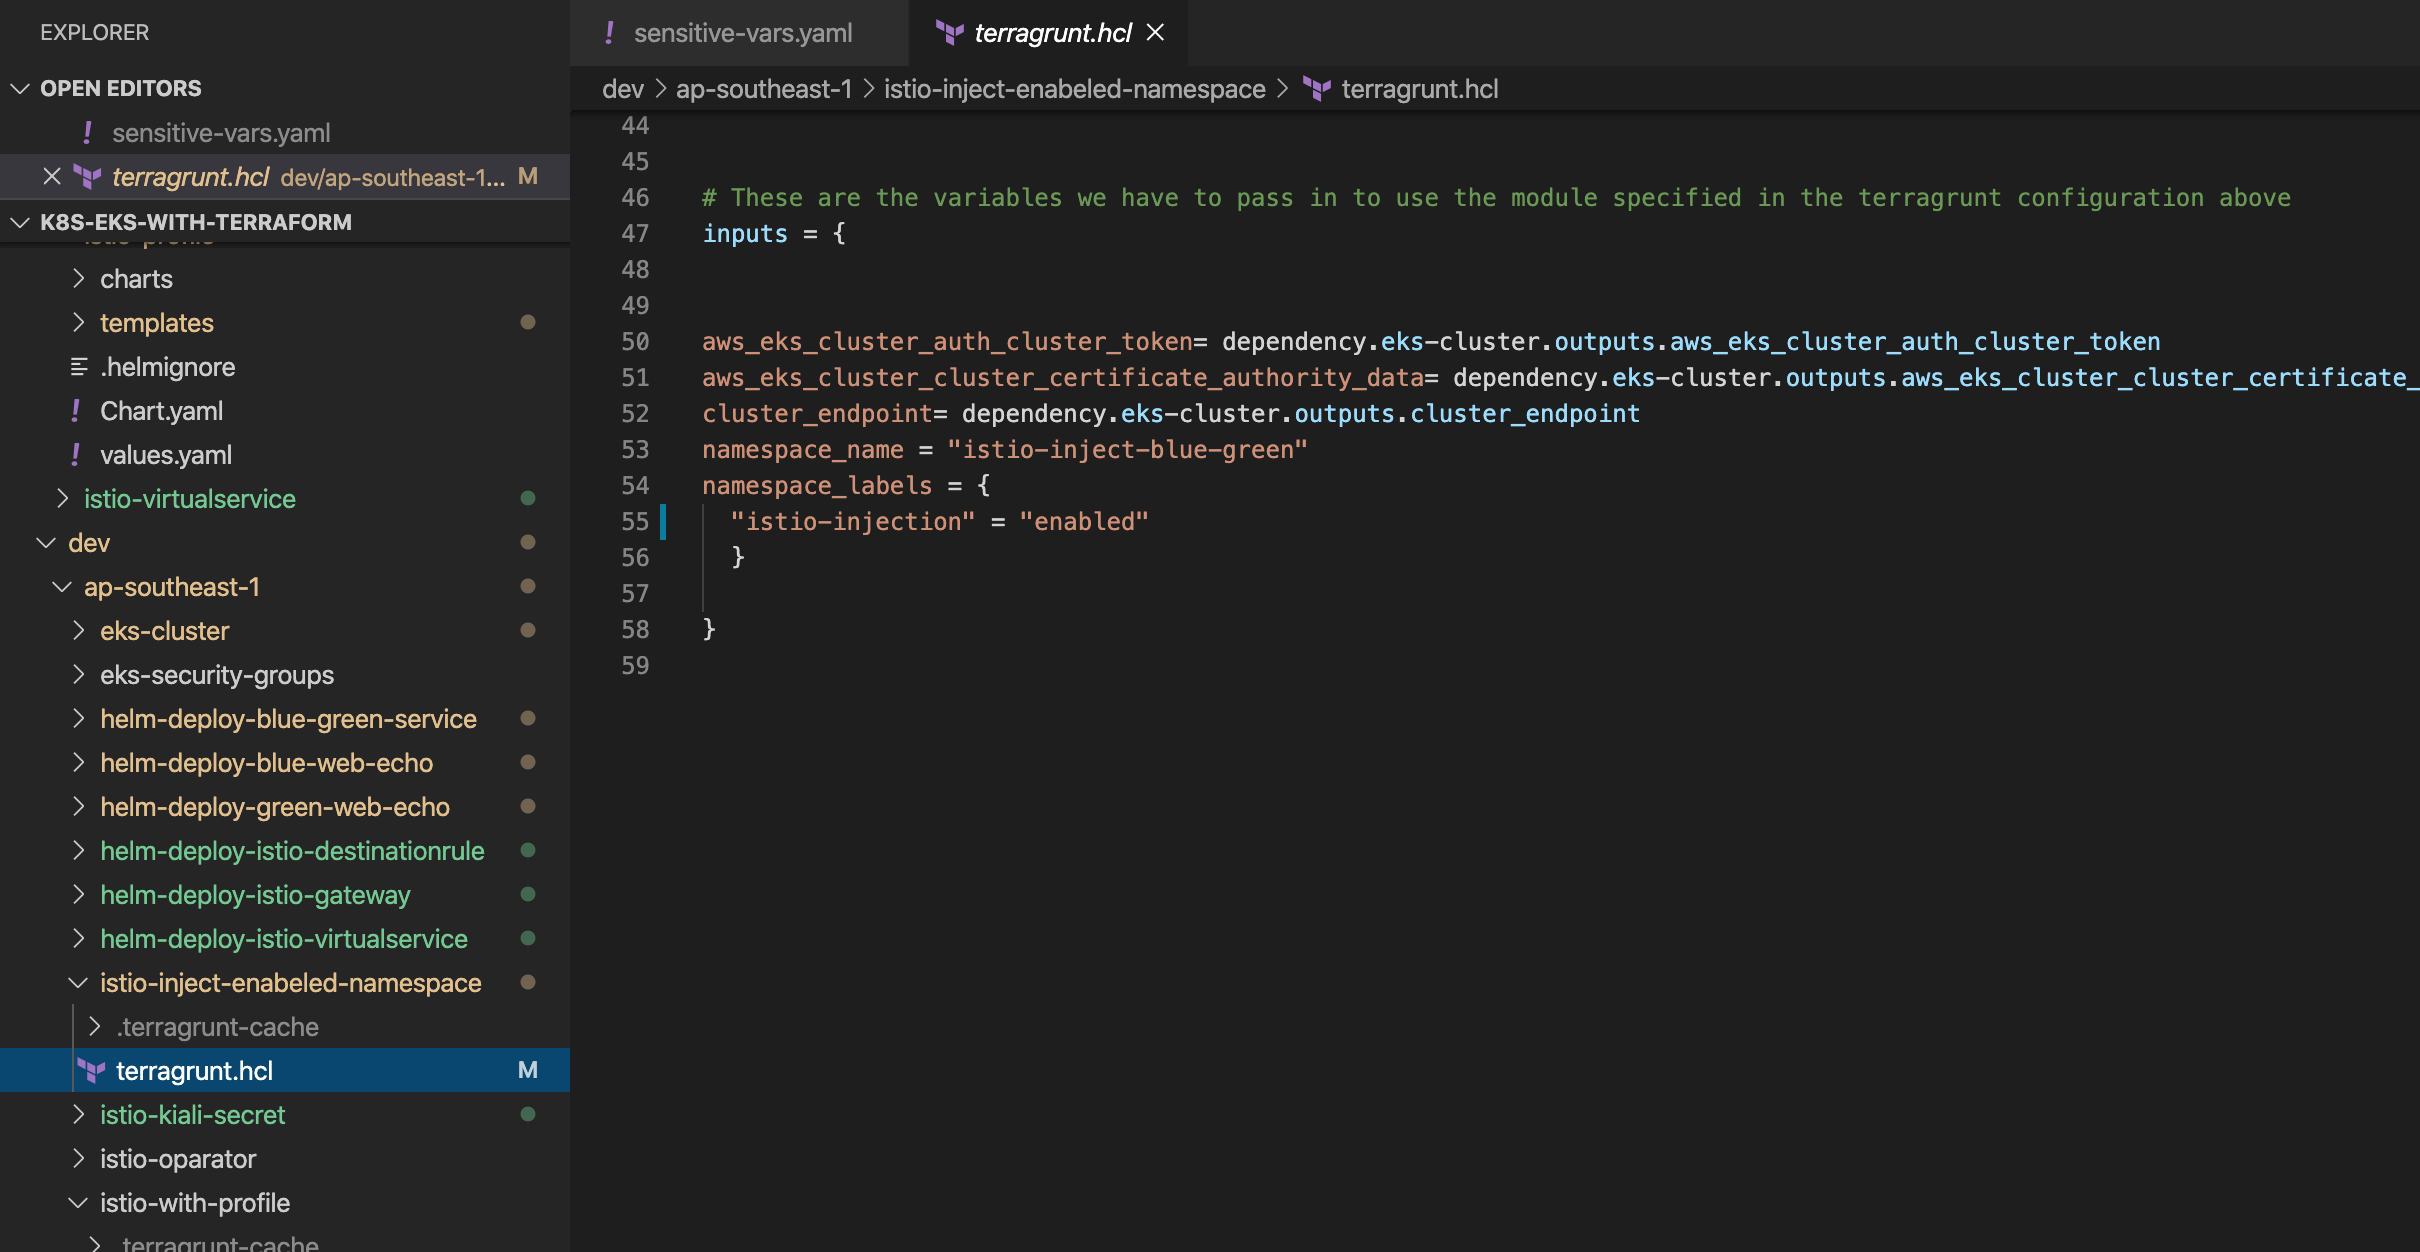
To verify the namespaces istio-injection inject enabled can be used following command.
➜  ~ kubectl get namespace -L istio-injection
NAME                      STATUS   AGE    ISTIO-INJECTION
default                   Active   5d1h
istio-inject-blue-green   Active   44h    enabled
istio-operator            Active   2d2h   disabled
istio-system              Active   22h    disabled
kube-node-lease           Active   5d1h
kube-public               Active   5d1h
kube-system               Active   5d1h
Before installing our blue-green application and service to this istio inject enabled namespace “istio-inject-blue-green”, we need to modify a few things in the helm chart.
Reminder: Remember to clean up previously installed "blue-green" pods and services if you have not done yet, as we are going to modify helm charts.
Let’s start with blue-green-service. Clean up the values.yaml and make values.yaml very simple with the following items.
service:
  type: ClusterIP
  port: 8600
  targetPort: 5678
routeinstance: "blue-green-web-echo"
I have also merged two different chart’s to one chart to deploy blue-green-web-echo. blue and green are the same services but with different versions v1,v2. It’s is like new versions(v1->v2) of API/Application. Check the chart “blue-green-web-echo” directly from Github.
Here are the crucial changes I made:
Move the args near images.
image:
  repository: hashicorp/http-echo
  pullPolicy: IfNotPresent
  # Overrides the image tag whose default is the chart appVersion.
  tag: "latest"
  args: "[\"-text\", \"blue-1.0\"]"
The most important change I made in _helpers.tpl add version: {{ .Release.Name }} labels, this is what we use in istio-destinationrule I will explain later this post.
  {{/*
Selector labels
*/}}
{{- define "blue-green-web-echo.selectorLabels" -}}
app.kubernetes.io/name: {{ include "blue-green-web-echo.name" . }}
app.kubernetes.io/instance: {{ .Release.Name }}
version: {{ .Release.Name }}
{{- end }}
Tips and tricks: At any point in time we can verify the helm chart by rendering it. If any error in the chart we can easily detect them before apply from terraform.
helm template <helm-chart-path>/blue-green-web-echo
It’s time to install all of then to istio inject enabled namespace “istio-inject-blue-green”.
Install service
cd ../helm-deploy-blue-green-service
terragrunt apply
Install blue deployments
cd ../helm-deploy-blue-web-echo
terragrunt apply
Install green deployments
cd ../helm-deploy-green-web-echo
terragrunt apply
Verify the installation.
➜  ~ kubectl get pod -n istio-inject-blue-green
NAME                                                 READY   STATUS    RESTARTS   AGE
blue-web-echo-blue-green-web-echo-8668c574f4-5vrrt   2/2     Running   0          5h46m
green-web-echo-blue-green-web-echo-7465cf589-tqb67   2/2     Running   0          5h47m
Whoot!!! Whoot!!!
Did you notice! The READY column, each pod has a side-car now. That is envoy sidecar.

We still need to install some other resource in k8s, to make our service accessible. Before proceed, We need a mental model of istio networking, At this moment istio has seven items.
* Sidecar
  - Configuration affecting network reachability of a sidecar.
Istio uses Envoy proxy as a Sidecar that is actually doing all heavy lifting tasks. All of your pod egress and ingress traffic is goes through this proxy.
Just wait a moment here, take a breath, and think about the power you gain by injecting a proxy as a sidecar. You can now have a control plane that can define how this envoy behaves. Time to look at Istio Architecture.
The istio pilot, at this moment pilot, citadel, Gallery together called istiod, do this for you. We just need to tell the pilot how we want to behave envoy. The way of telling this is configuring the Virtual Service and Destination Rule.
Not happy yet about sidecar, Please read more.
So, now we need to know what is Gateway, Gateway is the first component that is just after your ELB(network load balancer) like a gate to entering your amazing k8s and mesh world in layman terms.
* Gateway
  - Configuration affecting edge load balancer.

* Virtual Service
  - Configuration affecting label/content routing, sni routing, etc.

* Destination Rule
  - Configuration affecting load balancing, outlier detection, etc.
Ignore the following concept for now, as those are not need to continue with this post.
* Envoy Filter
  - Customizing Envoy configuration generated by Istio.

* Service Entry
  - Configuration affecting service registry.


* Workload Entry
  - Configuration affecting VMs onboarded into the mesh.
So, if you draw a picture of your mental model of what I just explain maybe like bellow.
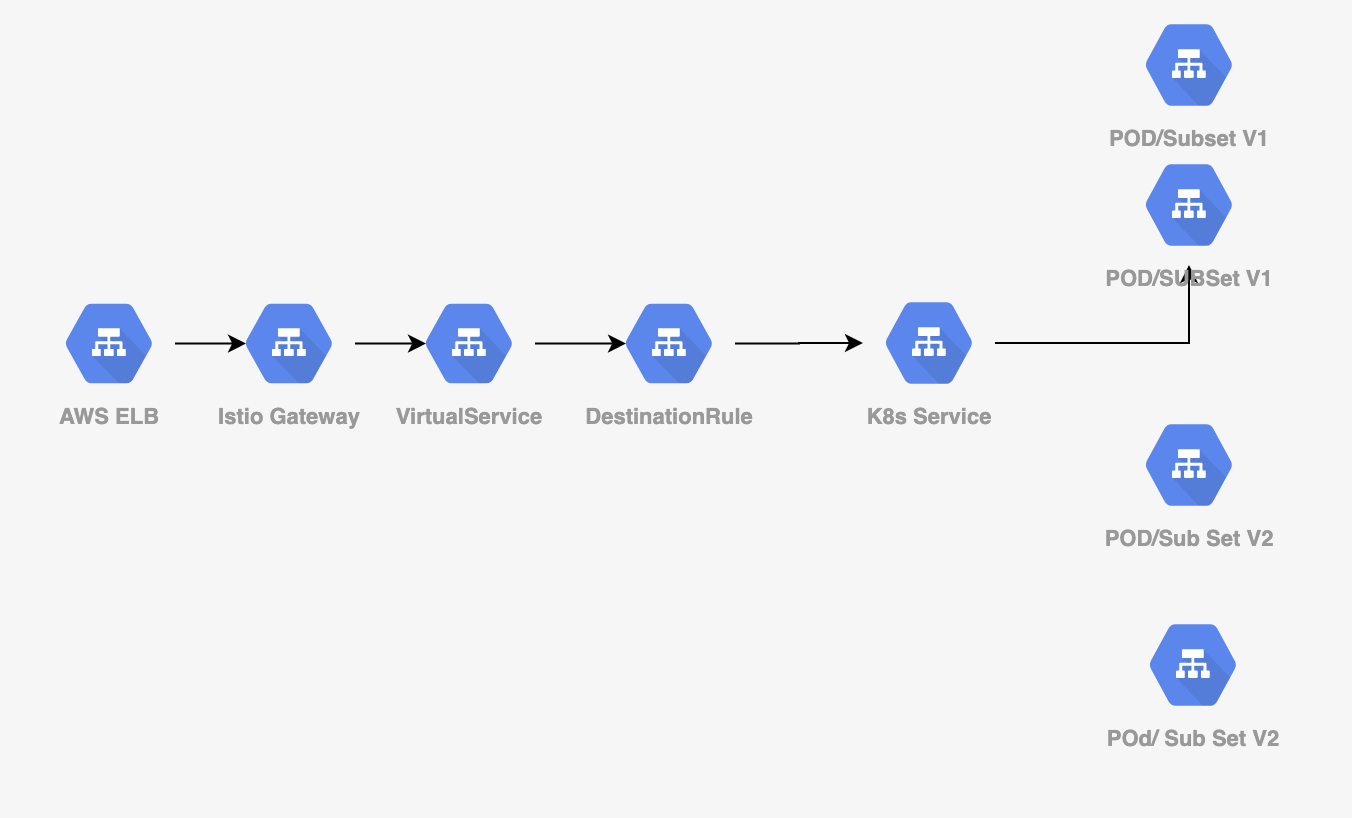
Now, back to work again, In case many things are unclear to you just don’t worry, at some point, you can glue altogether.
The first component we are going to deploy now is the istio gateway. The moment we install istio profile istio to create an ELB for us that brings traffic to the k8s i.e istio mesh. But we have to tell the certificate’s and hostname so istio can bring traffic to it.
Defining gateway is easy, please check the istio-gateway helm chart.
gateway.yaml file
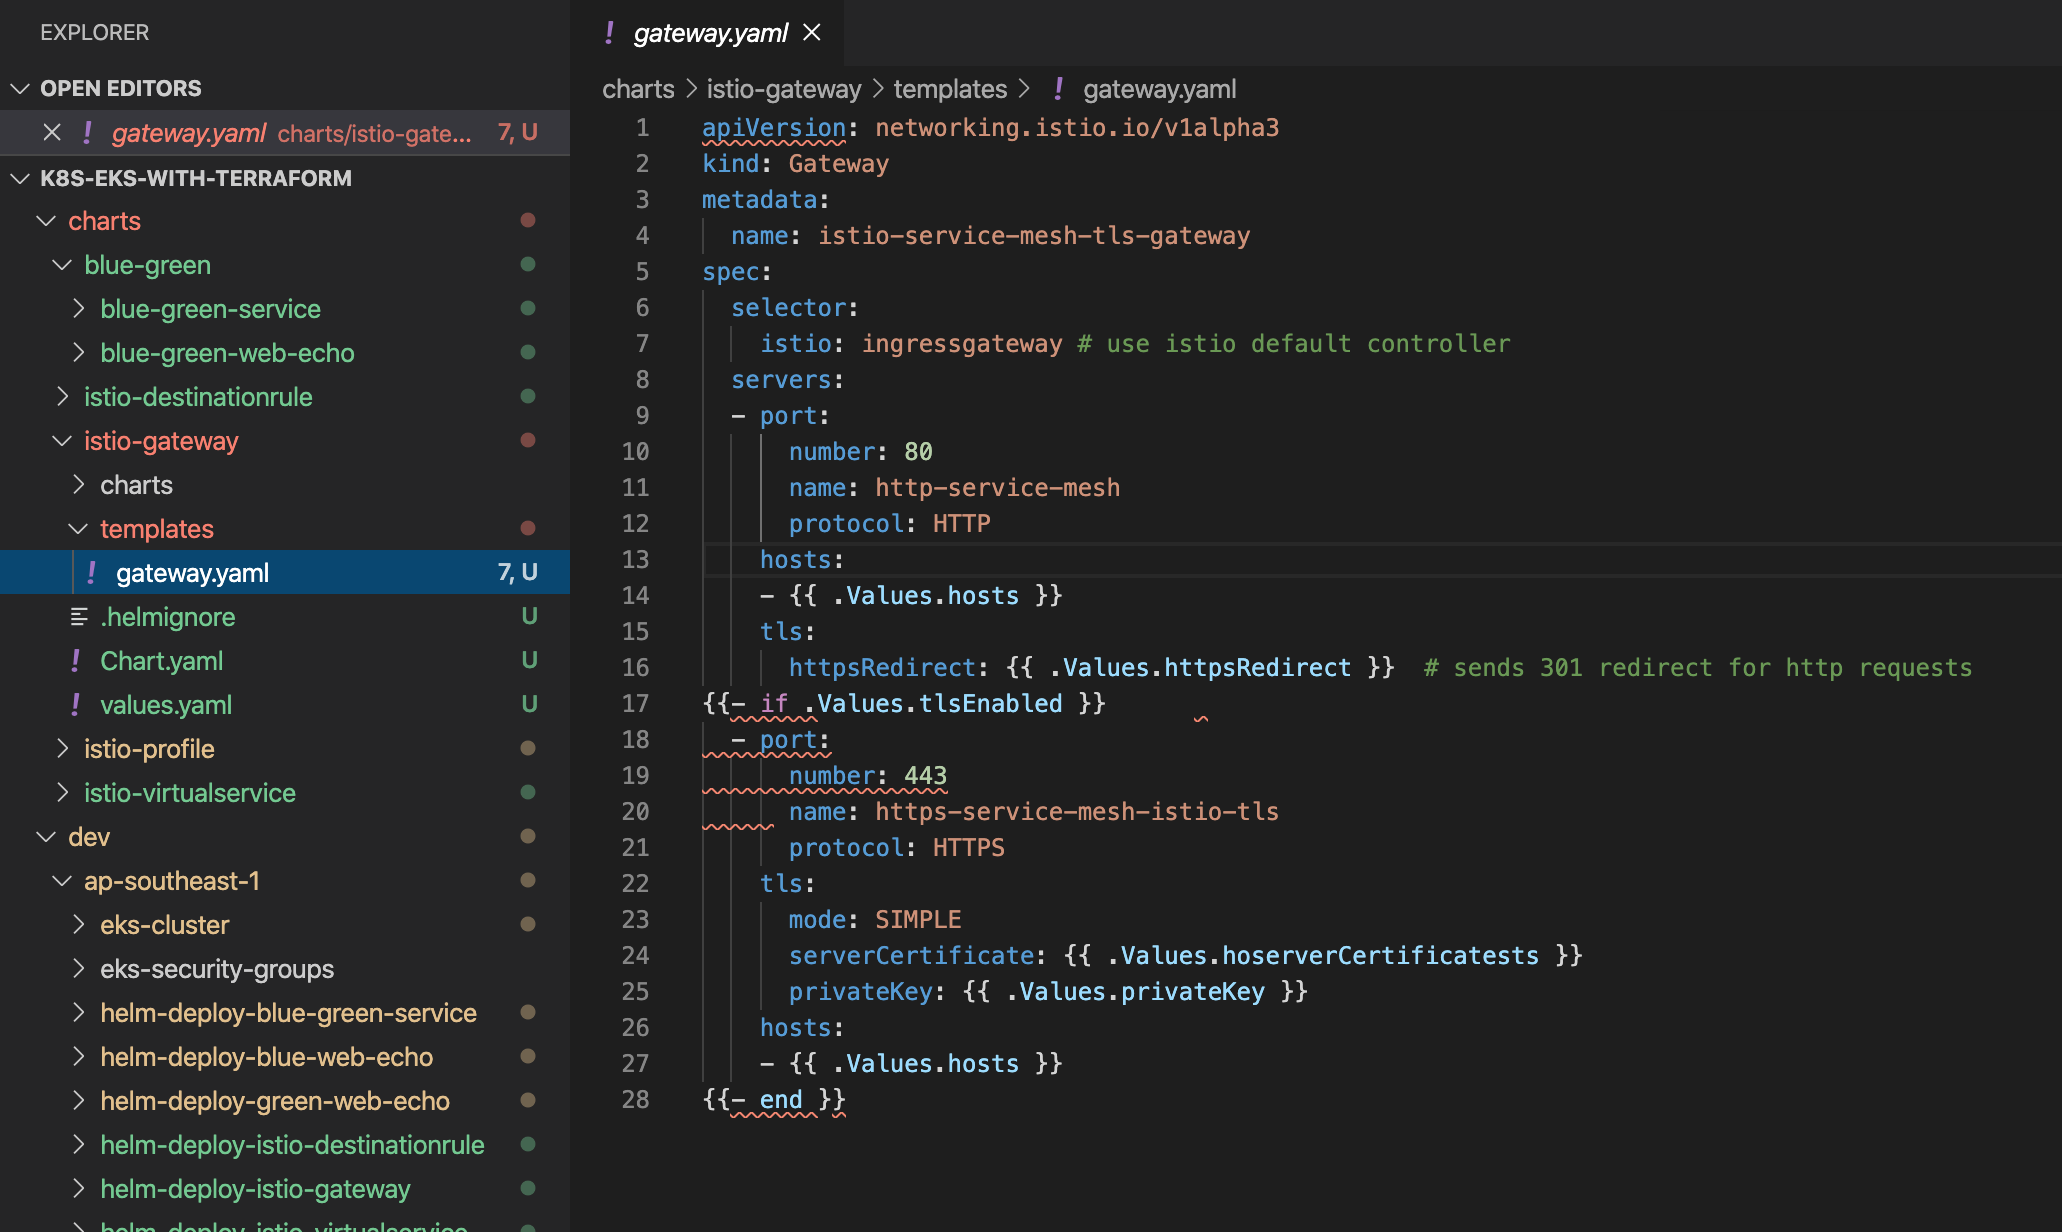
values.yaml file
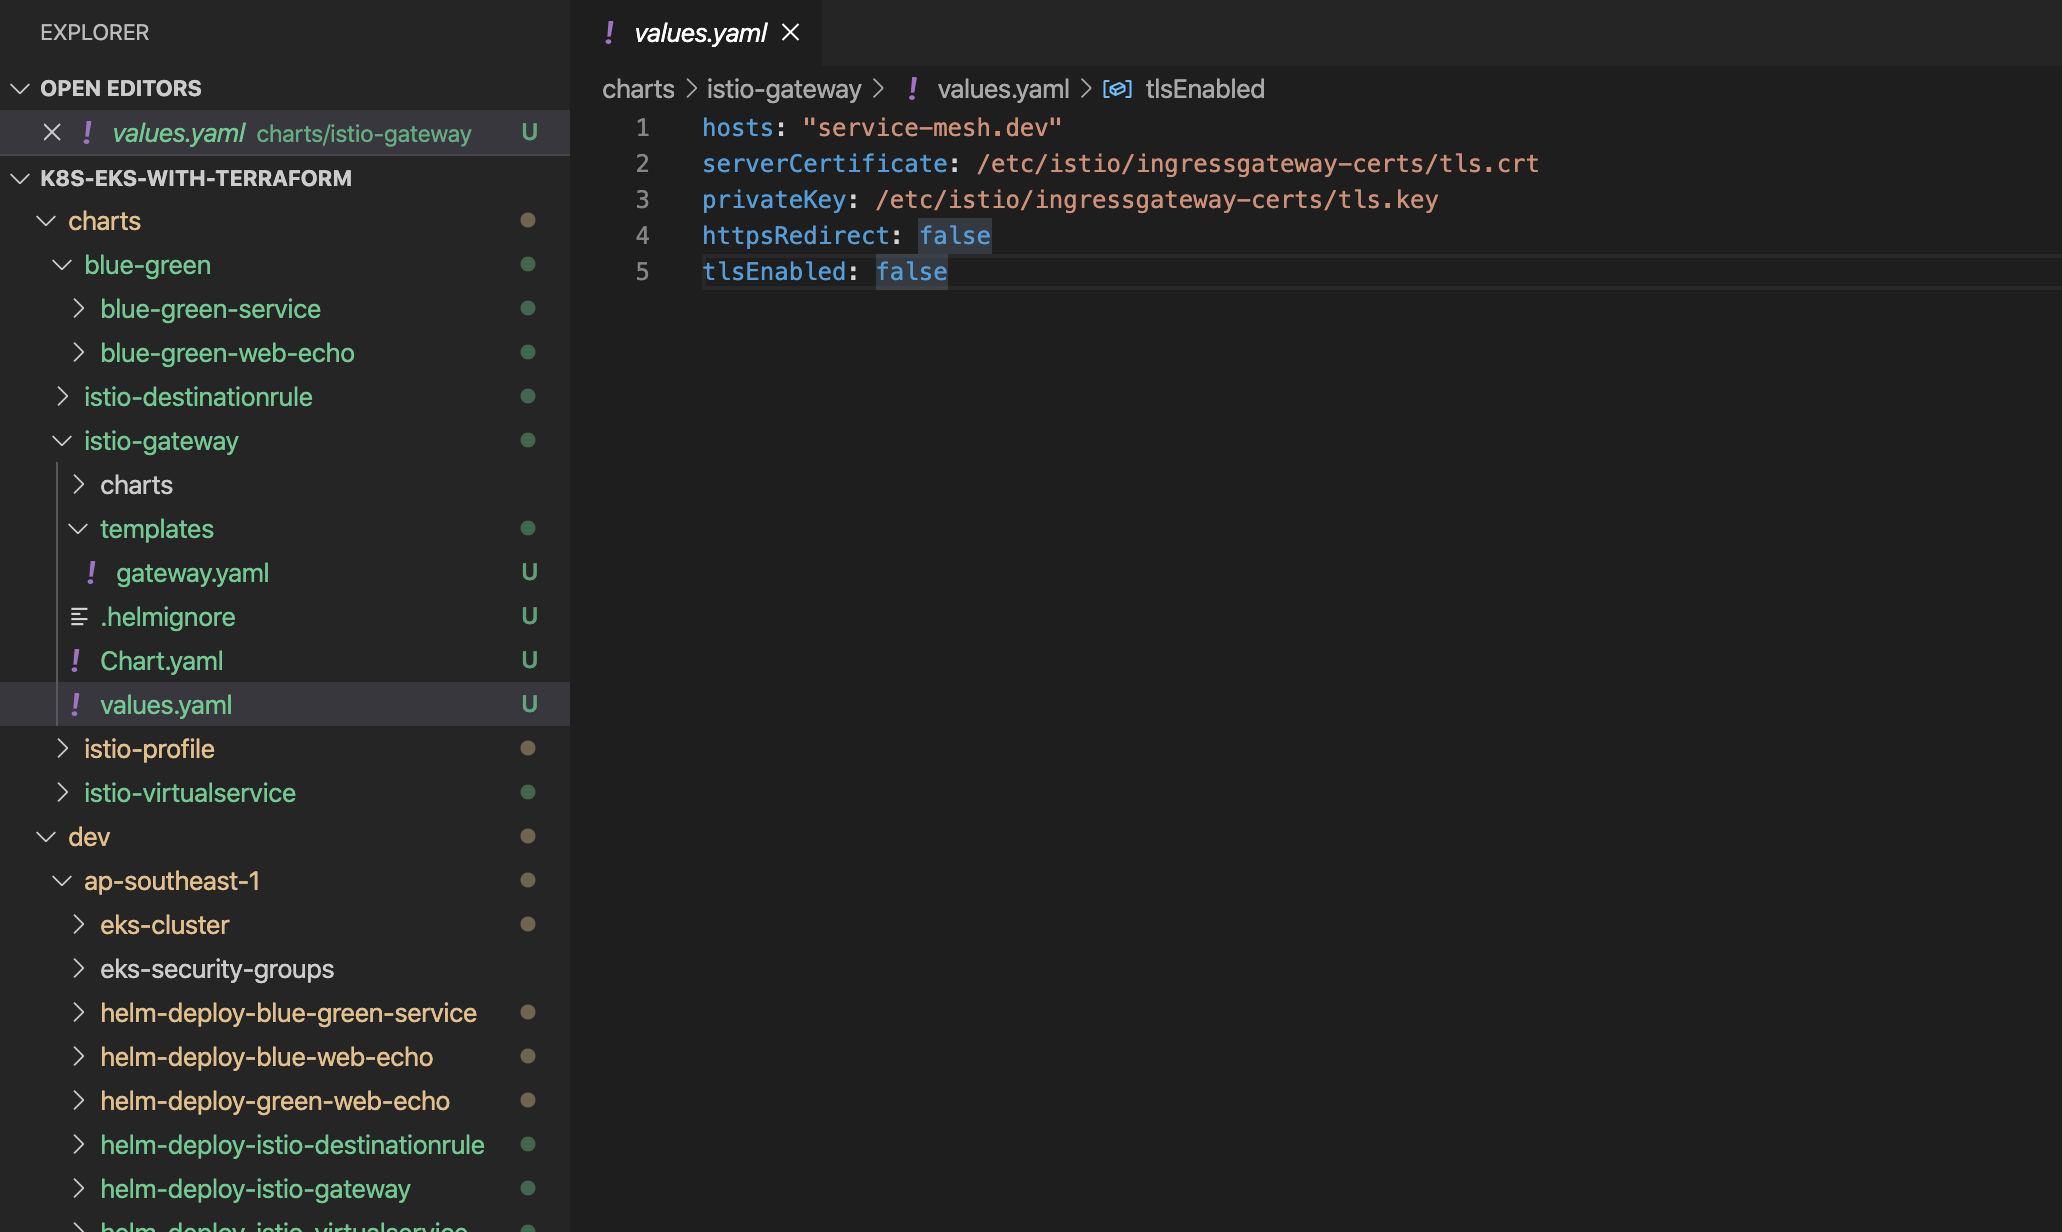
Here create the helm chart and parameterize its values from values.yaml So that the chart can be reusable.
The next concept is istio-virtualservice(virtual-service) when the traffic brings from the gateway, istio pilot check the istio-virtualservice that is a set of rules that define the destination of the traffic.
Here is a snippet of virtual service YAML, you can get this by render helm.
helm temltate <chart_path>
# Source: istio-virtualservice/templates/virtualservice.yaml
apiVersion: networking.istio.io/v1alpha3
kind: VirtualService
metadata:
  name: istio-prod-blue-green
spec:
  hosts:
  - service-mesh.dev
  gateways:
  - istio-service-mesh-tls-gateway
  http:
  - match:
    - uri:
        prefix: /v1
    rewrite:
        uri: /
    route:
    - destination:
        host: blue-green-service
        subset: v1
        port:
          number: 8600
Snipped....
Let’s describe a part of it, istio-service-mesh-tls-gateway is coming from gateway just created.
  gateways:
  - istio-service-mesh-tls-gateway
istio-service-mesh-tls-gateway must be matched with Gateway metadata name.
apiVersion: networking.istio.io/v1alpha3
kind: Gateway
metadata:
  name: istio-service-mesh-tls-gateway
The next section prefix tells the URL route path for this rule.
  http:
  - match:
    - uri:
        prefix: /v1
    rewrite:
        uri: /
    route:
    - destination:
        host: blue-green-service
        subset: v1
        port:
          number: 8600
destination host needs to be matched with the service name deployed.
    - destination:
        host: blue-green-service
        subset: v1
➜  ~ kubectl get svc -n istio-inject-blue-green
NAME                 TYPE        CLUSTER-IP      EXTERNAL-IP   PORT(S)    AGE
blue-green-service   ClusterIP   10.100.115.53   <none>        8600/TCP   22h
In this way, many route rules can be defined, just like following one tells, if any request comes with a cookie that has x-version=v2 route to the traffic to subset v2
#cookie base route
  - match:
    - uri:
        prefix: "/"
      headers:
        Cookie:
          regex: "^(.*?; )?(x-version=v2)(;.*)?$"
    rewrite:
      uri: /
    route:
    - destination:
        host: blue-green-service
        subset: v2
        port:
          number: 8600
You may already wonder what is subset, here comes the istio-destinationrule.
With destinationrule we can define subsets that match the pods with the labels sector. Do you remember we add “version: blue-web-echo” in our _helpers.tpl.
# Source: istio-destinationrule/templates/destinationrule.yaml
apiVersion: networking.istio.io/v1alpha3
kind: DestinationRule
metadata:
  name: istio-prod-blue-green-destination
spec:
  host: blue-green-service
  subsets:
  - name: v1
    labels:
     version: blue-web-echo
  - name: v2
    labels:
     version: green-web-echo
Now take the get the istio-ingressgateway LoadBalancer CNAME and add the DNS entry.
➜  ~ kubectl get svc -n istio-system
NAME                   TYPE           CLUSTER-IP       EXTERNAL-IP                                                                    PORT(S)                                                      AGE
grafana                ClusterIP      10.100.240.62    <none>                                                                         3000/TCP                                                     19h
istio-ingressgateway   LoadBalancer   10.100.226.64    ---->.elb.amazonaws.com   15021:31664/TCP,80:31659/TCP,443:30990/TCP,15443:31632/TCP   19h
istiod                 ClusterIP      10.100.0.34      <none>                                                                         15010/TCP,15012/TCP,443/TCP,15014/TCP,53/UDP,853/TCP         19h
kiali                  ClusterIP      10.100.164.7     <none>                                                                         20001/TCP                                                    19h
prometheus             ClusterIP      10.100.151.163   <none>                                                                         9090/TCP                                                     19h
As you see we use our host service-mesh.dev in istio gateway and other places. If you have control over any DNS (route 53, or other)service. Better add an entry with istio gateway CNAME and service-mesh.dev.
istio-ingressgateway   LoadBalancer   10.100.226.64    ---->.elb.amazonaws.com
service-mesh.dev   ---->.elb.amazonaws.com
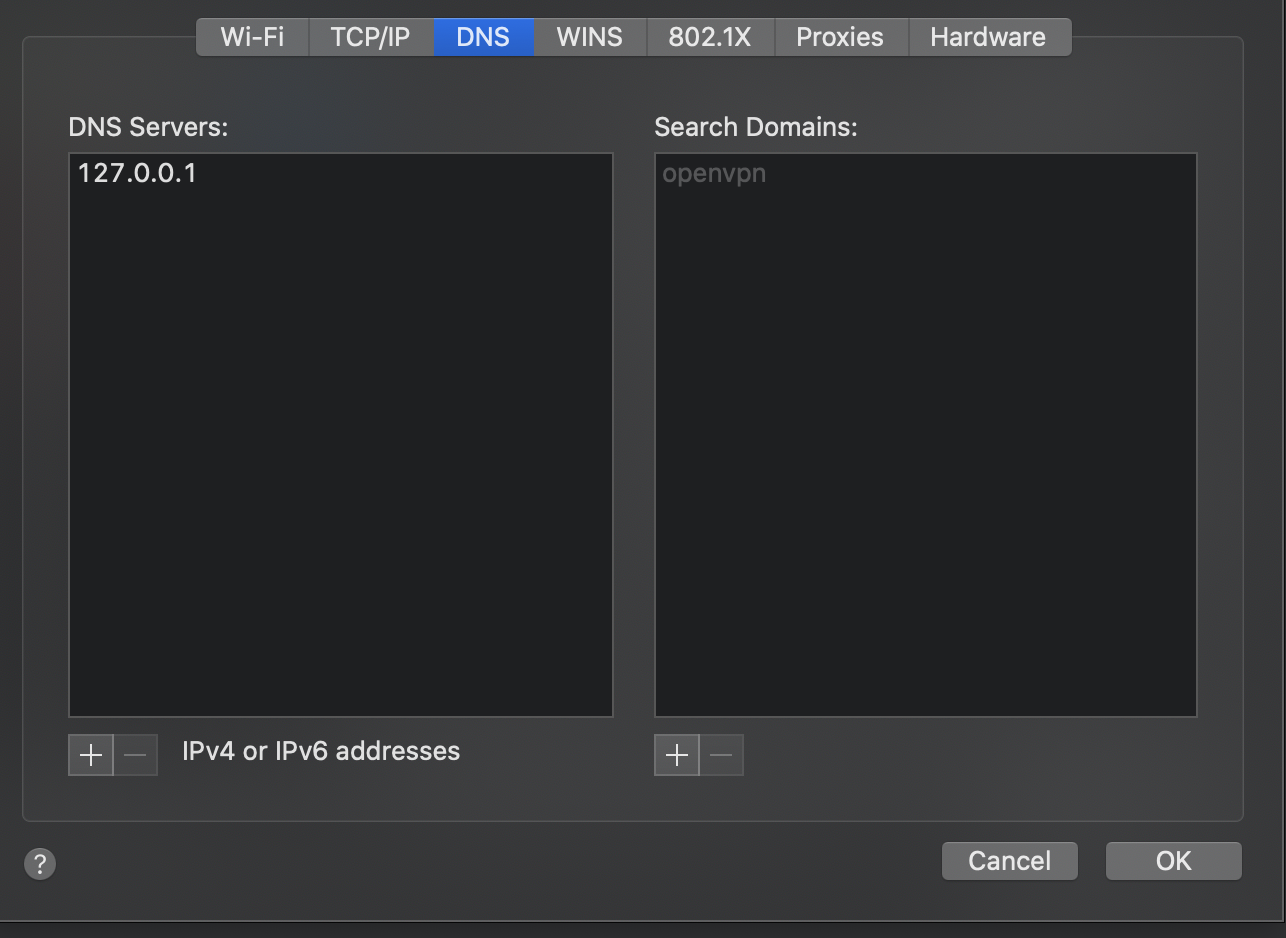
If you do not have control on any DNS service, You probably can try with changing /etc/hosts entry, However, I do not find any luck with CNAME working well with hosts entry change. I do have some luck with dnsmasq. Tried dnsmasq docker and changing some mac settings.
~ sudo docker run -p 53:53/tcp -p 53:53/udp --cap-add=NET_ADMIN \
    andyshinn/dnsmasq:2.75 \
    --host-record=service-mesh.dev,18.136.57.170

To flush dns in mac
sudo killall -HUP mDNSResponder
Now let’s have a look at final repo status
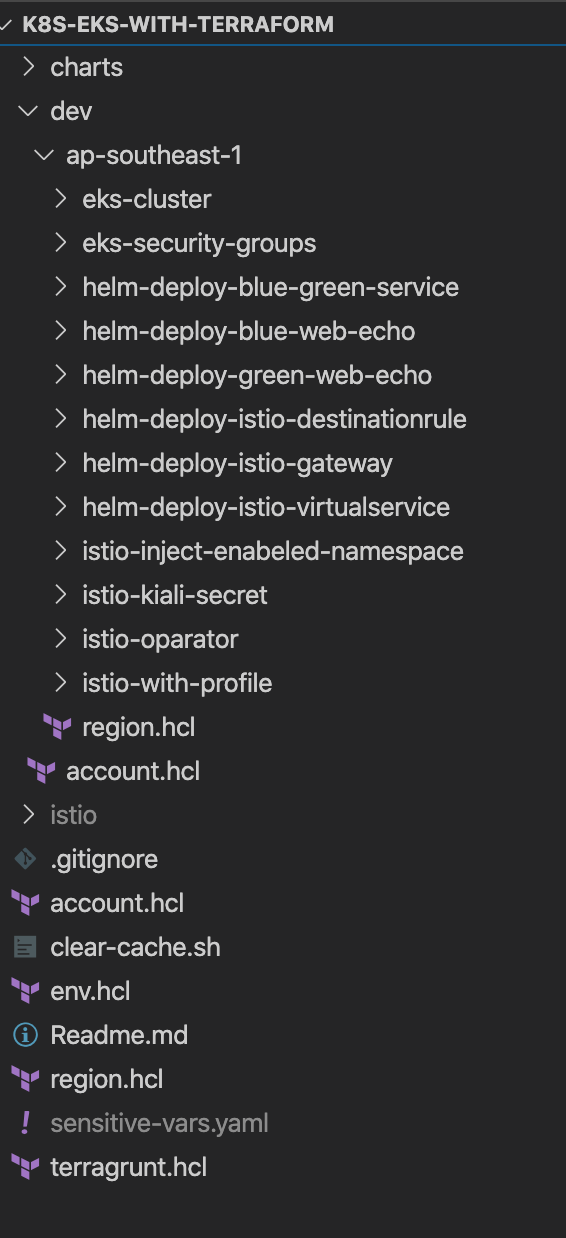
Do terragrunt apply, all new component’s, We can verify the istio config with kiali, It indicates if anything goes wrong.
It’s “curl -kis” time.
Default route

~ curl  http://service-mesh.dev
blue-1.0

With x-version=v2 in cookie

~ curl  -H 'cookie: x-version=v2;' http://service-mesh.dev
green-1.0

With x-version=v1 in cookie

~ curl  -H 'cookie: x-version=v1;' http://service-mesh.dev
blue-1.0
Success!!! It’s just a hello world in istio.
In real life, you can give a deploy with the same URL and ask your QA to verify the whole services set by adding a cookie x-version=v2 in their browser before you make that to the default route. How beautiful lifesaving amazing is that?!.
EOF