Automating and Scaling SecOps Task With Cloud-Native Events and Workflow
 In the enterprise, many repeatable tasks need to automate, for example, scan source code with SonarQube, scan source code for information leakage like secrets commit, scan source code to ensure third party licensing or scan the domain regularly for vulnerability, and many more. Argo Workflows is designed as a container-native workflow engine for orchestrating parallel jobs on Kubernetes. Some scanning is demanded to be in the CI pipeline, However, we cannot just pile up with lots of tasks in the CI pipeline, sometimes it’s preferred to have a parallel pipeline that may be monitored by the SecOps team, Compliance team, or SOC team. The modern CI pipeline shall be decentralized and can be owned by different teams. In all of these cases, Argo Workflow fits very well.
Let’s start with automating the secrets scan in the source repository.
I’m not going to talk about comparing tools and approaches here, Just pick truffleHog to scan the code.
We need a Kubernetes cluster to deploy Argoworkflow, Let’s have a local cluster with kind. If you already have a cluster deployed or have different preferences you can skip this section.
My environment is macOS and assumes you have already installed docker.
Install Kind
Prepare the cluster with kind. Kind is a tool for running local Kubernetes clusters using Docker container “nodes”.
Installing kind is very easy https://kind.sigs.k8s.io/docs/user/quick-start/#installation
brew install kind
Create the cluster
Now let’s create the cluster config with two nodes.
The cluster config yaml.
# three node (two workers) cluster config
kind: Cluster
apiVersion: kind.x-k8s.io/v1alpha4
nodes:
- role: control-plane
  image: kindest/node:v1.18.8@sha256:f4bcc97a0ad6e7abaf3f643d890add7efe6ee4ab90baeb374b4f41a4c95567eb
- role: worker
  image: kindest/node:v1.18.8@sha256:f4bcc97a0ad6e7abaf3f643d890add7efe6ee4ab90baeb374b4f41a4c95567eb
- role: worker
  image: kindest/node:v1.18.8@sha256:f4bcc97a0ad6e7abaf3f643d890add7efe6ee4ab90baeb374b4f41a4c95567eb
Creating the cluster with the following command.
kind create cluster –config cluster.yaml –name kind-argo
This will create a two nodes cluster with Kubernetes(k8s) v1.18.8.
Deploy Argo Workflows
Now we have a cluster, we can go ahead and install the Argo
kubectl –context kind-kind-argo create ns argo kubectl –context kind-kind-argo apply -n argo -f https://raw.githubusercontent.com/argoproj/argo/stable/manifests/quick-start-postgres.yaml
Next, We need to create a service account. I’m going to create a default service account for the cluster-admin role, In a production environment, create a service account based on your requirement to configure Argo to use that instead of running as cluster-admin.
kubectl –context kind-kind-argo create rolebinding default-admin
–clusterrole cluster-admin
–namespace argo
–serviceaccount=argo:default
The is we need to setup Workflow Executors, At this moment Argo workflow use docker as the default container runtime. kind’s cluster default container runtime is containerd, So we need to tell the Argo workflow to change the runtime.
We can choose from docker,kubelet,k8sapi,pns(Process Namespace Sharing) details docs. k8sapi executor does not support outputs from the base image layer, So in Kind pns(Process Namespace Sharing) makes more sense.
kubectl –context kind-kind-argo patch configmap workflow-controller-configmap
–namespace argo
–patch ‘{“data”: {“containerRuntimeExecutor”: “pns”}}’
–type merge
Verify Argo Workflows deployment
Now verify the deployment, check the all pods are running in argo namespaces.
kubectl get pod -n argo

NAME                                  READY   STATUS      RESTARTS   AGE
argo-server-6766d89498-2kmtg          1/1     Running     3          26m
hello-world-z6tlp                     0/2     Completed   0          6m27s
minio                                 1/1     Running     0          26m
postgres-56fd897cf4-25dbf             1/1     Running     0          26m
workflow-controller-b5d45d68f-prxlh   1/1     Running     0          26m
As we are running Argo Workflows locally, We can open a port-forward to access the namespace.
kubectl –context kind-kind-argo -n argo port-forward deployment/argo-server 2741:2746
Open the browser.
open http://localhost:2741
Now test with a simple workflow submit.
argo submit -n argo https://raw.githubusercontent.com/argoproj/argo/master/examples/hello-world.yaml
apiVersion: argoproj.io/v1alpha1
kind: Workflow
metadata:
  generateName: hello-world-
  labels:
    workflows.argoproj.io/archive-strategy: "false"
spec:
  entrypoint: whalesay
  templates:
  - name: whalesay
    container:
      image: docker/whalesay:latest
      command: [cowsay]
      args: ["hello world"]
We can see the status of the workflow using CLI or from UI.
Install the CLI with Mac Homebrew.
brew install argocd
argo list -n argo
NAME                STATUS      AGE   DURATION   PRIORITY
hello-world-z6tlp   Succeeded   14m   1m         0
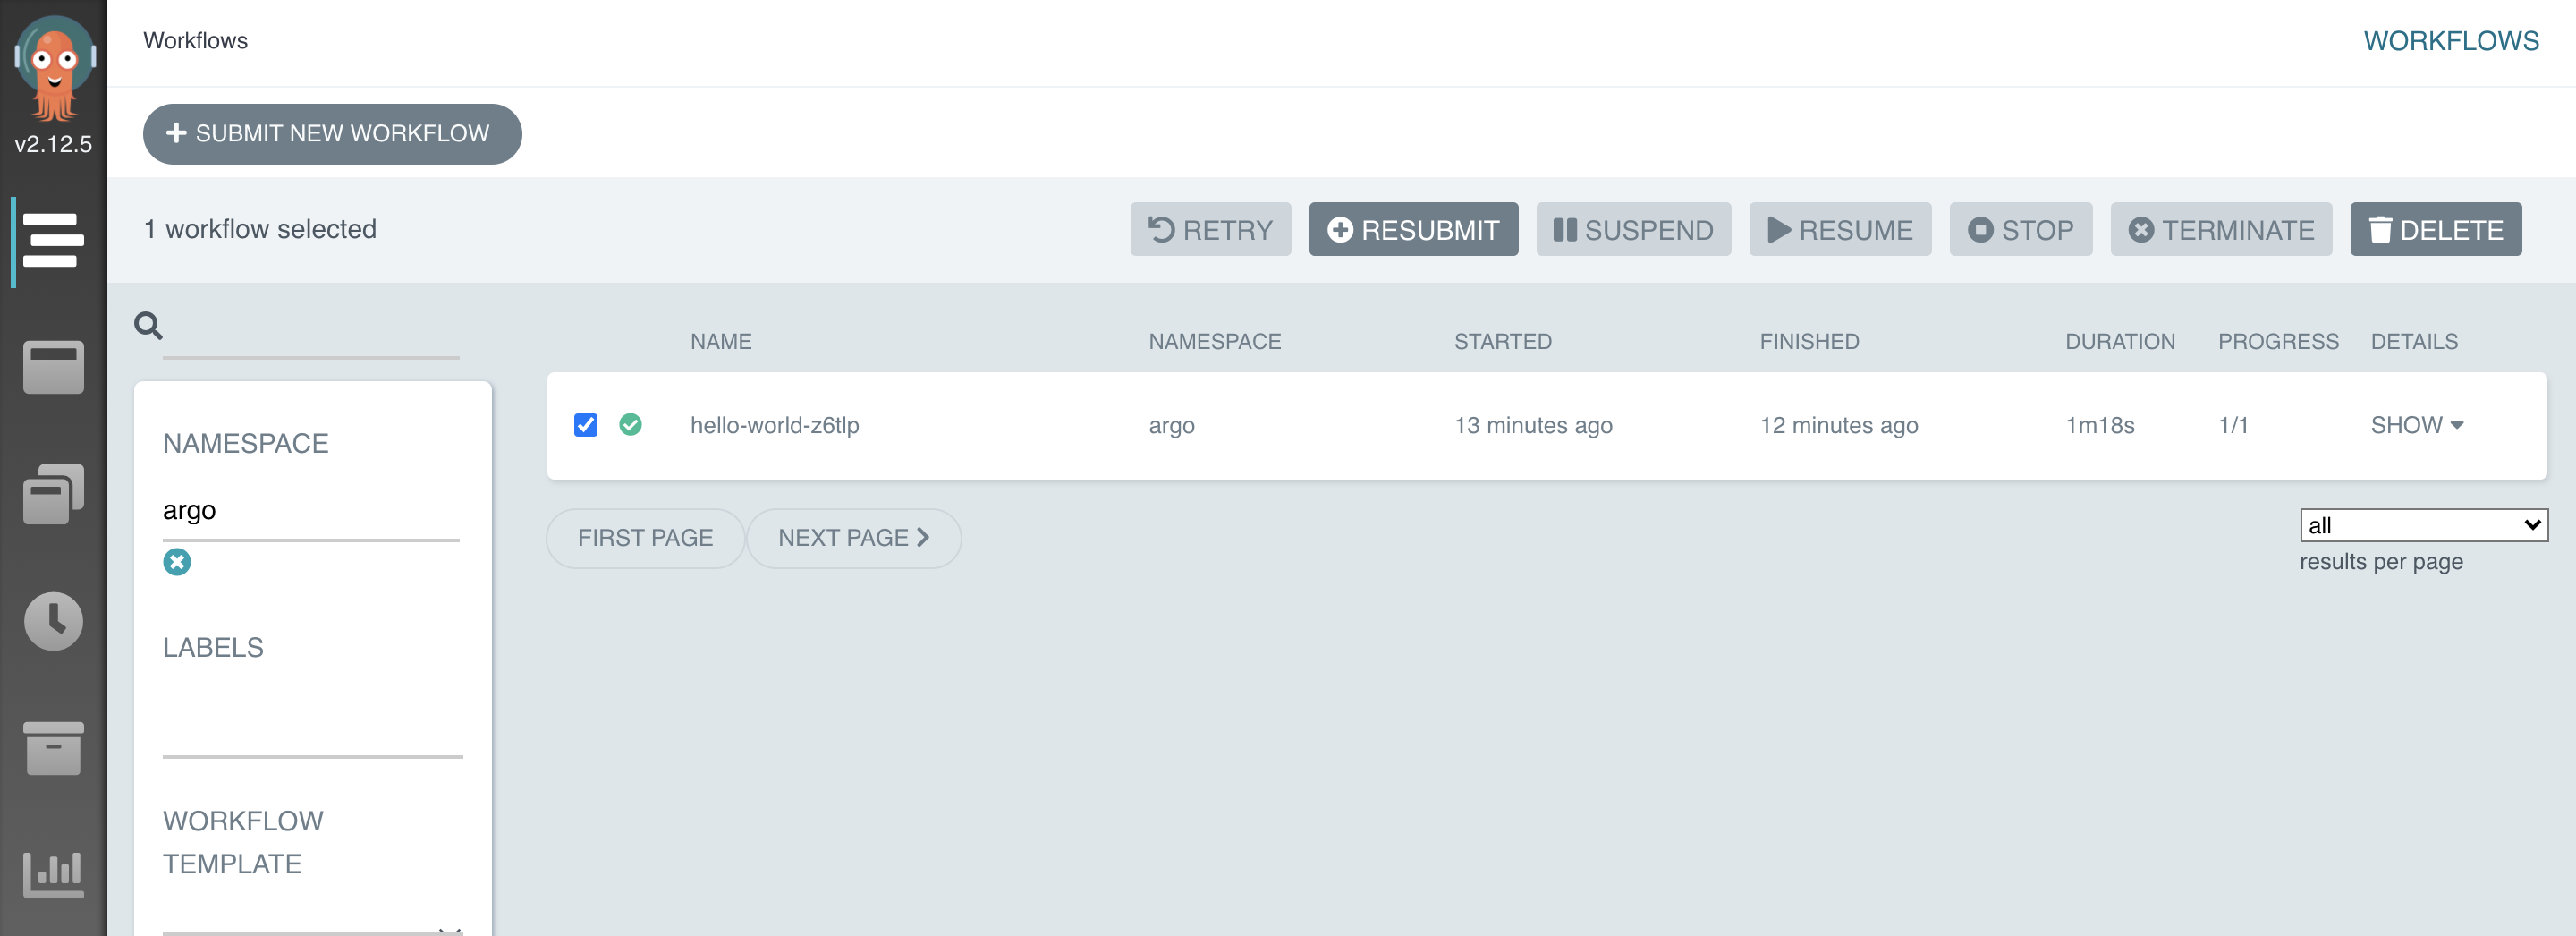
HelloWorld workflow run completed.
Secret scan in source code workflow
Now prepare the docker file for truffleHog, we need to install the truffleHog and copy a ssh private key of bitbucket that helps us to clone the source code from bitbucket.
ssh-keygen
assume truffehog is the private key file.
FROM python:3.8-buster
WORKDIR /tmp
RUN git clone https://github.com/dxa4481/truffleHog.git
WORKDIR /tmp/truffleHog
RUN python setup.py install
RUN mkdir .ssh/
COPY truffehog .ssh/
Now prepare the workflow.
apiVersion: argoproj.io/v1alpha1
kind: Workflow
metadata:
  generateName: secret-scanner
spec:
  entrypoint: entry
  parallelism: 1
  templates:
    - name: entry
      dag:
        tasks:
          - name: generate-artifact-all-repo
            template: getallrepo

          - name: scan-cloned-repo
            template: scan-with-trufflehog
            dependencies: [generate-artifact-all-repo]
            arguments:
              parameters:
                - name: repo
                  value: "{{item}}"
            withParam: "{{tasks.generate-artifact-all-repo.outputs.parameters.repos}}"
I have two tasks here scan-cloned-repo is dependent on generate-artifact-all-repo, which means generate-artifact-all-repo executes first and the scan-cloned-repo will run with parameters that are basically the output of generate-artifact-all-repo.
Let’s look at generate-artifact-all-repo task.
    - name: getallrepo
      script:
        image: dwdraju/alpine-curl-jq
        command: [sh]
        source: |
          GHUSER=microsoft; curl "https://api.github.com/users/$GHUSER/repos?per_page=100" | grep  'clone_url' |cut -f 4 -d '"' | jq -R -s -c 'split("\n")' >/tmp/allrepos.json
      outputs:
        parameters:
          - name: repos
            valueFrom:
              path: /tmp/allrepos.json
In this task, I have listed 100 repositories of Microsoft public repository from GitHub, and just grep and extract the clone URL and make a JSON output file using jq.
The next is scan-cloned-repo.
    - name: scan-with-trufflehog
      inputs:
        parameters:
          - name: repo
      script:
        image: nahidupa/trufflehog:latest
        command: [sh]
        source: |
            REPONAME=$(echo {{inputs.parameters.repo}} | cut -f 5 -d "/" | cut -f 1 -d "." ) ; cd /tmp;git clone {{inputs.parameters.repo}} $REPONAME;trufflehog  $REPONAME > /tmp/scan_output.txt
      outputs:
        artifacts:
          - name: scanoutput_{{pod.name}}
            path: /tmp/scan_output.txt
In these steps the task in running depending on parallelism value we set and clone one by one repo and scan with trufflehog.
parallelism: 1
The output will be saved as an artifact that we can process later. All together the workflow look like
apiVersion: argoproj.io/v1alpha1
kind: Workflow
metadata:
  generateName: secret-scanner
spec:
  entrypoint: entry
  parallelism: 1
  templates:
    - name: entry
      dag:
        tasks:
          - name: generate-artifact-all-repo
            template: getallrepo

          - name: scan-cloned-repo
            template: scan-with-trufflehog
            dependencies: [generate-artifact-all-repo]
            arguments:
              parameters:
                - name: repo
                  value: "{{item}}"
            withParam: "{{tasks.generate-artifact-all-repo.outputs.parameters.repos}}"

    - name: getallrepo
      script:
        image: dwdraju/alpine-curl-jq
        command: [sh]
        source: |
          GHUSER=microsoft; curl "https://api.github.com/users/$GHUSER/repos?per_page=100" | grep  'clone_url' |cut -f 4 -d '"' | jq -R -s -c 'split("\n")' >/tmp/allrepos.json
      outputs:
        parameters:
          - name: repos
            valueFrom:
              path: /tmp/allrepos.json

    - name: scan-with-trufflehog
      inputs:
        parameters:
          - name: repo
      script:
        image: nahidupa/trufflehog:latest
        command: [sh]
        source: |
            REPONAME=$(echo {{inputs.parameters.repo}} | cut -f 5 -d "/" | cut -f 1 -d "." ) ; cd /tmp;git clone {{inputs.parameters.repo}} $REPONAME;trufflehog  $REPONAME > /tmp/scan_output.txt
      outputs:
        artifacts:
          - name: scanoutput_{{pod.name}}
            path: /tmp/scan_output.txt
In production, If you have private repositories, you need to add the below script so the git can clone with SSL.
eval `ssh-agent -s`
echo \"StrictHostKeyChecking no\" >> /etc/ssh/ssh_config
ssh-add .ssh/truffehog
SonarQube example
Now have a look at example SonarQube scan
apiVersion: argoproj.io/v1alpha1
kind: Workflow
metadata:
  generateName: sonerqube-scanner
  labels:
    workflows.argoproj.io/archive-strategy: "false"
spec:
  entrypoint: soner-scan
  templates:
    - name: soner-scan
      script:
        image: sonar-qube-base:latest
        command: [bash]
        source: |
          eval `ssh-agent -s`
          echo "StrictHostKeyChecking no" >> /etc/ssh/ssh_config
          ssh-add .ssh/cert
          cd /tmp
          git clone <git url>
          # Start Sonar Scanner
          dotnet sonarscanner begin /k:"<ProjectIDFromSonarqube>" \
          /n:"<PROJECTNAMEINSONARQUBE>"  \
          /d:sonar.login="<ProjectIDFromSonarqube>" \
          /d:sonar.host.url="<sonarqubeurl>"   # Restore NuGet packages
          dotnet restore <vs.sln>
          # Build and test the application
          dotnet build <vs.sln>
          # End Sonar Scanner
          dotnet sonarscanner end /d:sonar.login="<ProjectIDFromSonarqube>" ; exit 0
Adjust the script base on your value. Must need to change the following items.
<git url> <PROJECTNAMEINSONARQUBE> <ProjectIDFromSonarqube> <sonarqubeurl> <vs.sln>
In a cloud environment, we can configure the s3 bucket as artifact storage. Argo support multiple cloud environments. Here is an AWS example.
s3 bucket configure for artifact storage.
To configure s3 bucket to use as artifact output, we need to create an IAM user in AWS with programmatic access.
aws iam create-user –user-name
Attach the policy on it.
{
  "Version":"2012-10-17",
  "Statement":[
    {
      "Effect":"Allow",
      "Action":[
        "s3:PutObject",
        "s3:GetObject",
        "s3:GetBucketLocation"
      ],
      "Resource":"arn:aws:s3:::changeit-bucket-name/*"
    }
  ]
}
And then create a secret in argo namespace.
cat argo-work-flow-s3-cred.yaml
apiVersion: v1
kind: Secret
metadata:
  name: argo-work-flow-s3-cred
type: Opaque
data:
  accessKey: <base64>
  secretKey: <base64>
kubectl apply -f argo-work-flow-s3-cred.yaml -n argo
The next important configuration is to tell Argo to use this s3 bucket as the default artifact store.
artifact-repository.yaml
apiVersion: v1
kind: ConfigMap
metadata:
  # if you want to use this config map by default - name it "artifact-repositories"
  name: artifact-repositories
  annotations:
    # if you want to use a specific key, put that's key into this annotation
    workflows.argoproj.io/default-artifact-repository: default-v1
data:
  default-v1: |
    s3:
      bucket: argo-work-flow-artifact-eks-sonarqube
      keyFormat: prefix/in/bucket
      endpoint: s3.amazonaws.com
      accessKeySecret:
        name: argo-work-flow-s3-cred
        key: accessKey
      secretKeySecret:
        name: argo-work-flow-s3-cred
        key: secretKey
kubectl apply -f artifact-repository.yaml
We can configure multiple s3 buckets and Ref as artifactRepositoryRef in workflow spec, for example,
apiVersion: v1
kind: ConfigMap
metadata:
  # if you want to use this config map by default - name it "artifact-repositories"
  name: artifact-repositories-testssl
  annotations:
    # if you want to use a specific key, put that's key into this annotation
    workflows.argoproj.io/default-artifact-repository: artifact-repositories-testssl
data:
  artifact-repositories-testssl: |
    s3:
      bucket: argo-work-flow-artifact-testssl-eks-sonarqube
      keyFormat: prefix/in/bucket
      endpoint: s3.amazonaws.com
      accessKeySecret:
        name: argo-work-flow-s3-cred
        key: accessKey
      secretKeySecret:
        name: argo-work-flow-s3-cred
        key: secretKey
spec:
  entrypoint: entry
  artifactRepositoryRef:
    configMap: artifact-repositories-testssl # default is "artifact-repositories"
    key: artifact-repositories-testssl # default can be set by the annotation
Argo events
Now next steps are to trigger the workflow based on an event, that could be when a new code merge then you want to run the sonar scanner workflow or you may want to run your workflow based on other events like AMQP, AWS SNS, AWS SQS, Cron Schedules, GCP PubSub.
Here come the argo events projects, support wide ranges of cloud events source. Argo-Events supports 20+ event sources now. The complete list of event sources is available here.
Let’s deploy the Argo events by following steps.
Create the namespace
kubectl create namespace argo-events
Deploy Argo Events, SA, ClusterRoles, Sensor Controller, EventBus Controller and EventSource Controller
kubectl apply -f https://raw.githubusercontent.com/argoproj/argo-events/stable/manifests/namespace-install.yaml
Deploy the eventbus,
kubectl apply -n argo-events -f https://raw.githubusercontent.com/argoproj/argo-events/stable/examples/eventbus/native.yaml
Create a Service Account
kubectl -n argo-events create sa argo-events-sa # already been created
kubectl -n argo-events create role deployments-watcher –verb=list,watch –resource=deployments.apps,workflows.argoproj.io
kubectl -n argo-events create rolebinding deployments-watcher-role-binding –role=deployments-watcher –serviceaccount=argo-events:argo-events-sa
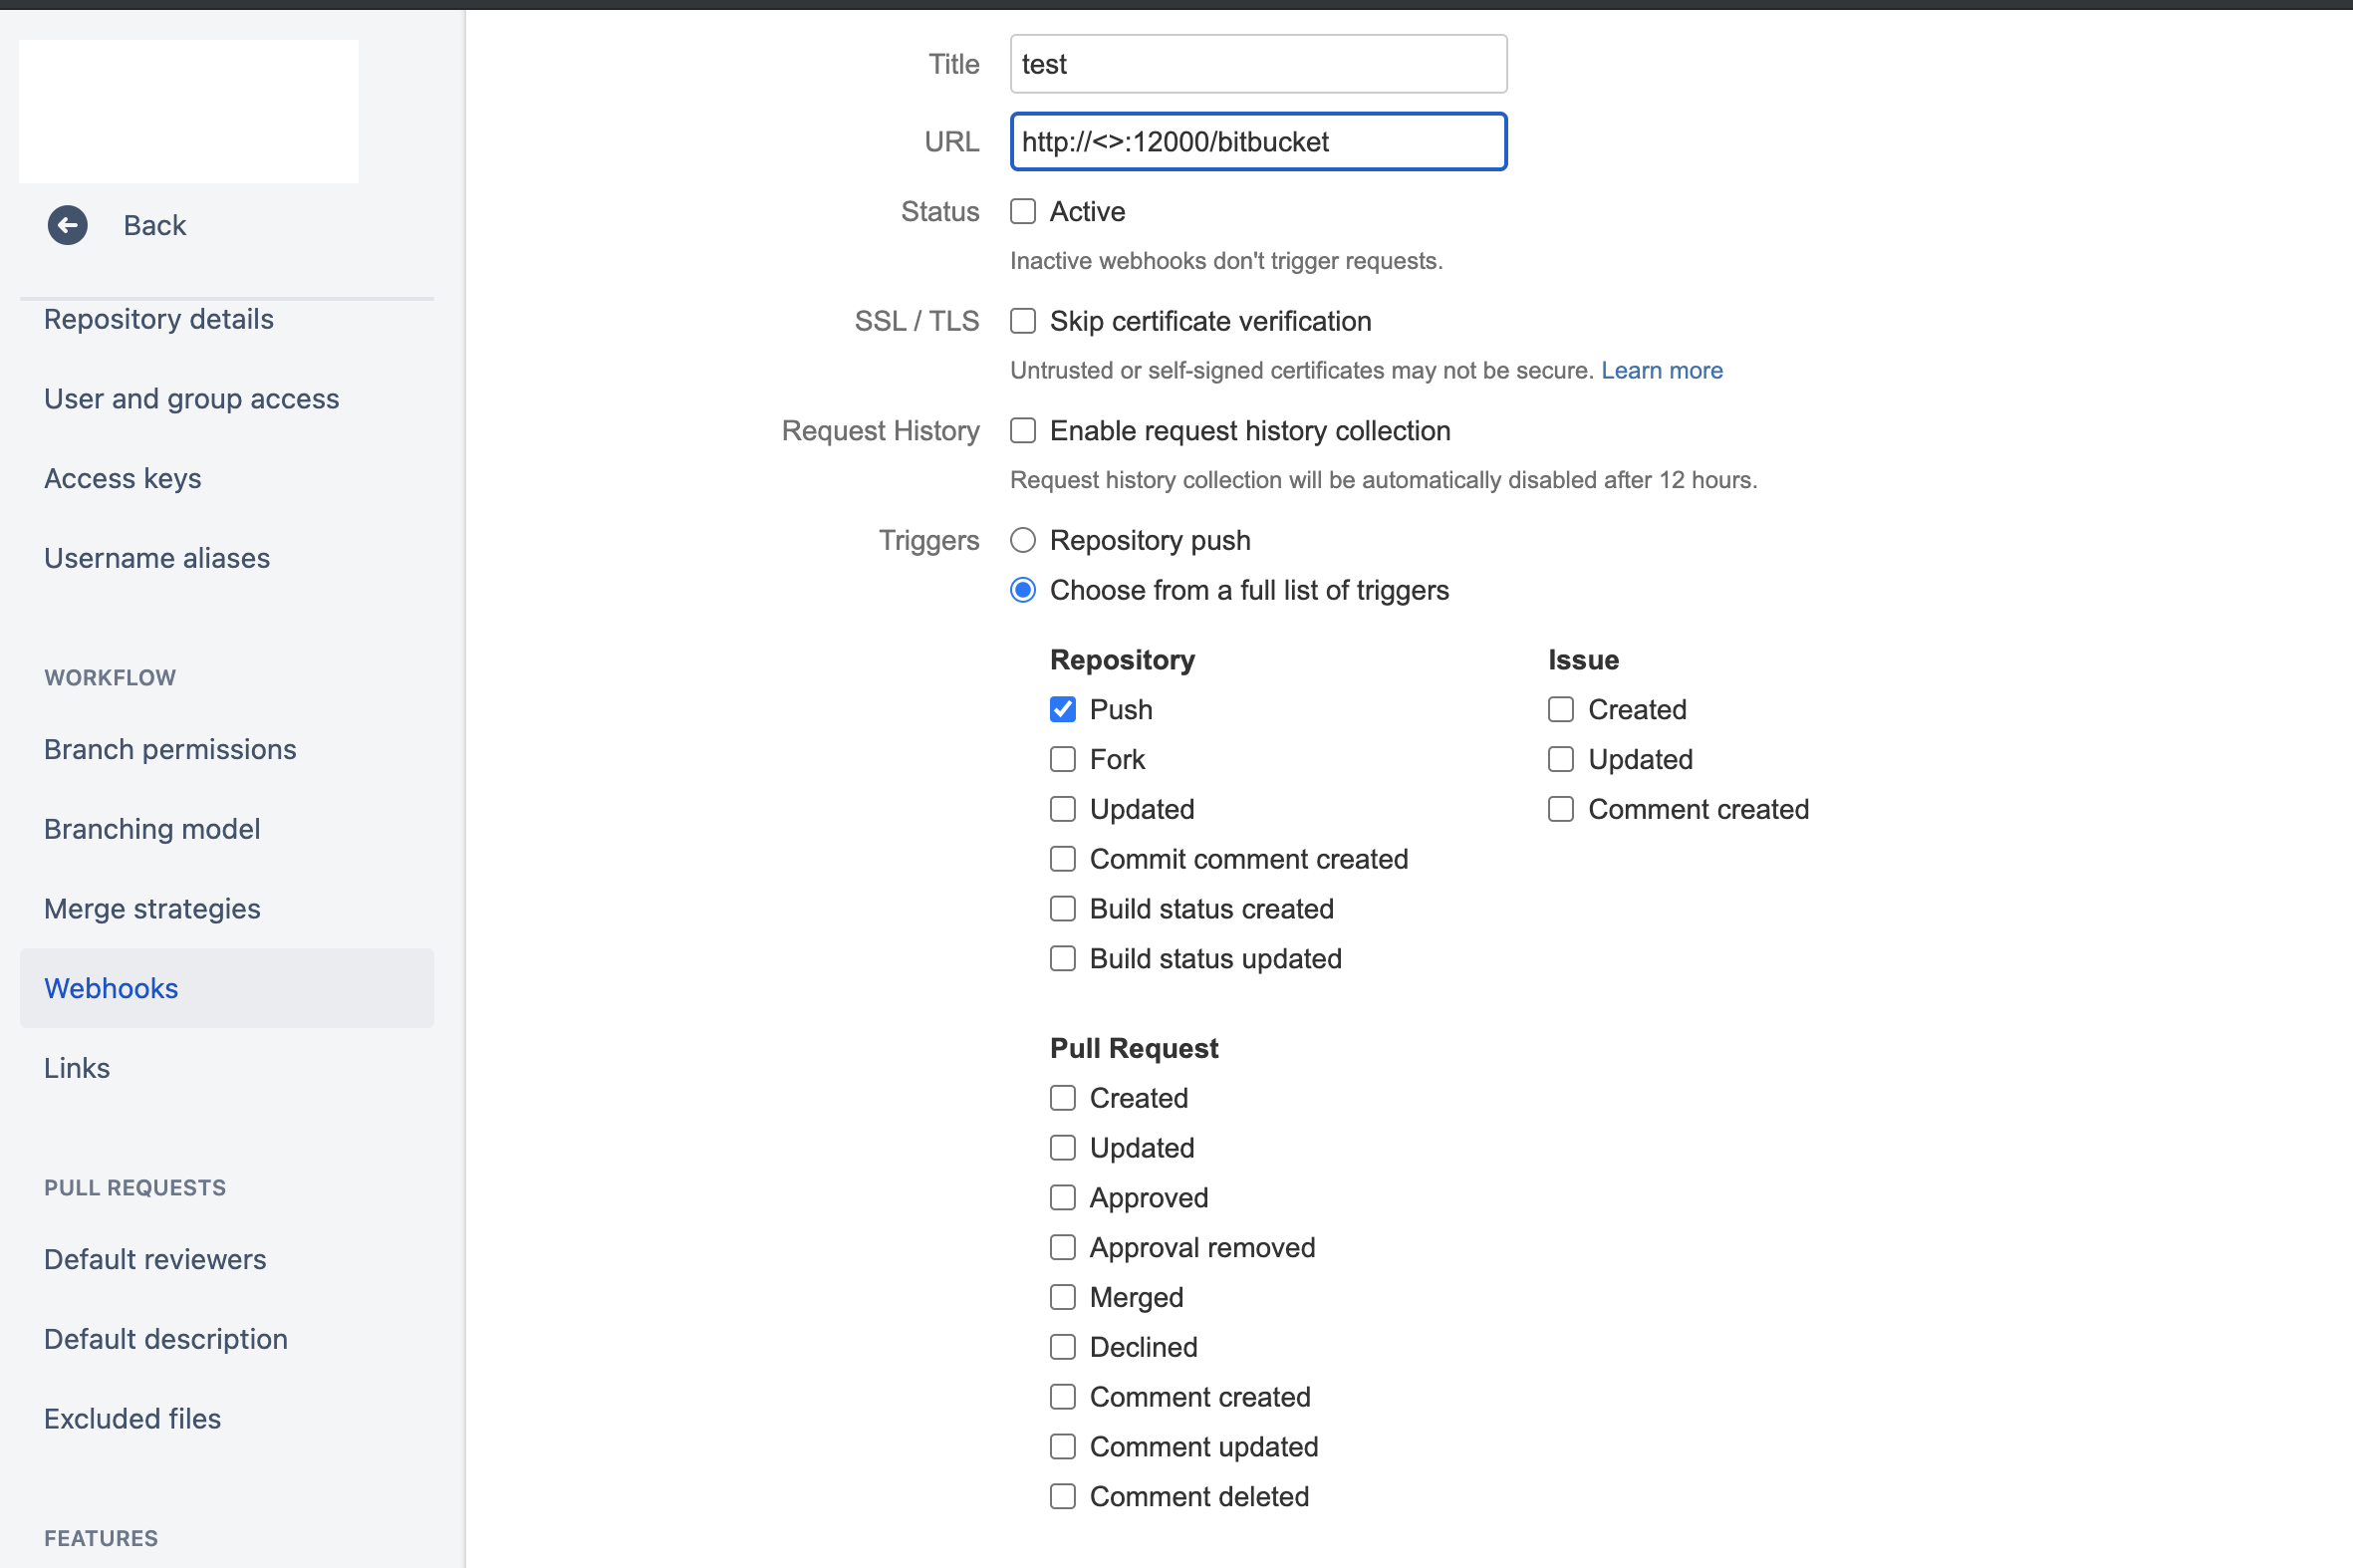
We will now see how can we create a webhook in bitbucket and trigger the SonerQube argo workflows.
apiVersion: argoproj.io/v1alpha1
kind: EventSource
metadata:
  name: webhook
spec:
  webhook:
    # event-source can run multiple HTTP servers. Simply define a unique port to start a new HTTP server
    bitbucket:
      # port to run HTTP server on
      port: "12000"
      # endpoint to listen to
      endpoint: /bitbucket
      # HTTP request method to allow. In this case, only POST requests are accepted
      method: POST
kubectl apply -f webhook.yaml
kubectl -n argo-events port-forward webhook-eventsource- 12000:12000
Calling the webhook.
curl -X POST -d “{}” http://localhost:12000/bitbucket
In production, you can expose the argo with Loadbalancer or an ingress. Here is a service for NLB in AWS, that expose the argo.
apiVersion: v1
kind: Service
metadata:
  name: webhook-service
  annotations:
    service.beta.kubernetes.io/aws-load-balancer-backend-protocol: tcp
    service.beta.kubernetes.io/aws-load-balancer-cross-zone-load-balancing-enabled: 'true'
    service.beta.kubernetes.io/aws-load-balancer-type: nlb
    service.beta.kubernetes.io/aws-load-balancer-internal: "true"
spec:
  type: LoadBalancer #ClusterIP LoadBalancer
  selector:
    controller: eventsource-controller
    eventsource-name: webhook
    owner-name: webhook
  ports:
    - port: 12000
      targetPort: 12000
Now we can go ahead and configure our bitbucket and point the webhook to the argo event URL.
The next concept is deploying a sensor.
Sensor defines a set of event dependencies (inputs) and triggers (outputs). It listens to events on the eventbus and acts as an event dependency manager to resolve and execute the triggers.
apiVersion: argoproj.io/v1alpha1
kind: Sensor
metadata:
  name: webhook
spec:
  template:
    serviceAccountName: argo-events-sa
  dependencies:
    - name: soner-scan-webhook
      eventSourceName: webhook
      eventName: bitbucket
  triggers:
    - template:
        name: webhook-workflow-trigger
        k8s:
          group: argoproj.io
          version: v1alpha1
          resource: workflows
          operation: create
          source:
            resource:
              apiVersion: argoproj.io/v1alpha1
              kind: Workflow
              metadata:
                generateName: soner-scan-webhook
              spec:
                entrypoint: soner-scan
                templates:
                  - name: soner-scan
                    dag:
                      tasks:
                        - name: sonarscanner
                          template: getallrepo
                        - name: slack-notify
                          template: slack-notify
                          dependencies: [sonarscanner]

                  - name: slack-notify
                    script:
                      image: slack-notify:latest
                      command: [bash]
                      source: |
                        <changeme>
                        ./slack-notify

                  - name: getallrepo
                    script:
                      image: sonar-qube-base:latest
                      command: [bash]
                      source: |
                        <changeme>
kubectl apply -f bitbucket-webhook-sensor.yaml -n argo-events
Now we have a complete cycle bitbucket->sensor->argoworkflow->slacknoify.
We can integrate many more like testssl, scan a large set of domains with Nmap, etc.
In conclusion, although the argo is currently in CNCF Incubating projects, However, it’s already pretty useful and I do not found any major issue with it, maybe many features we will see soon.
Get this posts code and yaml here
Be lazy !!! Automate and Enjoy.